How To Change The Repository (RPD) Password in OBIEE
We can Change the Oracle BI Repository Password Using the obieerpdpwdchg Utility
Use the following steps to Change The Repository (RPD) Password:
1. Navigate to the obieerpdpwdchg utility, which is located under $BI_DOMAIN_HOME/bitools/bin directory.
Type the following arguments for obieerpdpwdchg:
-I name_and_path_of_existing_repository
-O name_and_path_of_new_repository
2. Then, enter the current (old) password and the new password when prompted. The repository password must be longer than five characters and cannot be empty.
1. Use adctrl and select option#8 (This will not be visible) to skip thefailed jobs
2. Restart adop using "restart=yes" parameter
** If the failed jobs are numerous, then better to re-start this patch once again with autoskip option.
ie. adop restart=no abandon=yes flags=autoskip
This command will restart the patch once again from starting onwards and will skip all the failures if any comes. But make sure to review the log file at the end of the patch application that you have skipped the failures that you want to.
Weblogic Server Smart Update Patching :
Steps to apply weblogic server smart update patch:
Refer Note:
How to Apply WebLogic Server (WLS) Patches Using Smart Update [Video] (Doc ID 876004.1)
1.Download the patch
2.Copy the files (for example, E5W8.jar and WGQJ.jar) and the patch-catalog_xxx.xml from the zip file to the target machine. You do not need the readme file.
Problem description The Weblogic admin server and / or managed server(s) are unable to start properly and throwing an authentication denied error message.
Reason: weblogic.security.SecurityInitializationException: Authentication for user <user> denied
weblogic.security.SecurityInitializationException: Authentication for user <user> denied
at weblogic.security.service.CommonSecurityServiceManagerDelegateImpl.doBootAuthorization(Unknown Source)
at weblogic.security.service.CommonSecurityServiceManagerDelegateImpl.initialize(Unknown Source)
at weblogic.security.service.SecurityServiceManager.initialize(Unknown Source)
at weblogic.security.SecurityService.start(SecurityService.java:141)
at weblogic.t3.srvr.SubsystemRequest.run(SubsystemRequest.java:64)
Truncated. see log file for complete stacktrace
Possible root causes and solutions
Root cause #1
The Weblogic boot.properties file is corrupted or contains invalid principal and credentials
Solution >> boot.properties reset
·Backup and clear the cache and data directories under <WL Domain>/servers/<Admin & Managed server>
·Recreate boot.properties (put back your plain text username and password) under <WL Domain>/servers/<Admin & Managed server>/security directory and restart the affected server(s)
Root cause #2
The Weblogic boot.properties file is valid but the security realm is corrupted or in an invalid state
Solution >> Weblogic Admin username and password reset
·Backup your Weblogic server domain
·Rename or delete <WL Domain>/security/DefaultAuthenticatorInit.ldift
The online patching cycle consists of five phases which are executed in order. Example of a typical online patching cycle:
source /EBSapps.env run adop phase=prepare adop phase=apply patches=123456 adop phase=finalize adop phase=cutover source /EBSapps.env run adop phase=cleanup
Note that after cutover the command line environment should be re-loaded as the run edition file system has changed.
In a multi-node deployment, adop commands are only executed from the primary node. The primary adop session uses remote execution to automatically perform required actions on any secondary node.
Multiple phases of adop can be executed in a single line command. Example of combined finalize/cutover/cleanup:
adop phase=finalize,cutover,cleanup
Prior to cutover, it is possible to execute additional “apply” and “finalize” phases as needed. Example of applying multiple patches using separate apply commands:
Note that it is possible to apply additional patches after running the finalize phase, but if you do so then you will need to run the finalize phase again. Finalize must always be run immediately prior to cutover.
ADOP Common Parameters
workers= [default: computed]
Number of parallel workers used to execute tasks. Default value is computed principally according to number of available CPU cores.
input_file=
adop parameters can be specified in a text file, with one
=
on each line of the file. Command line parameters override input file parameters.
Controls the level of diagnostic log detail displayed on the console output. Each log message is tagged with a level:
1) statement – is only used for debugging. 2) procedure – is only used for debugging high level procedures. 3) event – is used to display informational messages in normal processing. This is the default value. 4) warning – is used to indicate an internal error that is handled by the system and does not affect processing. 5) error – indicates an action failed and will need to be reviewed by the user, but the system was able to continue processing. 6) unexpected – indicates an unrecoverable error that halts processing and requires user intervention before processing can continue.
Setting loglevel will display messages at that level and higher.
prompt=(yes|no) [default: yes]
Specifies whether adop should prompt for user input on warnings. By default adop will ask user whether to continue or exit on some warning messages. If this parameter is set to “no” adop will remain fully non-interactive, and will continue past any warning messages without user confirmation.
Below is the list of Diagnostic Parameters. Normally these parameters are not used, until unless directed by Oracle Support:
allowcoredump=(yes|no) [default: no]
Specifies whether adop should create a core dump if it crashes. This option should only be used if directed by support.
analytics=(yes|no) [default: no]
Controls whether adop writes additional reports with information that might be helpful in some diagnostic situations. This option should not be used unless directed by Support.
defaultsfile= [default: adalldefaults.txt]
Name of the response file providing default parameter values for non-interactive execution of adadmin and adop. The file must be in the$APPL_TOP/admin/$TWO_TASK directory in both run edition and patch edition file systems. The default file “adalldefaults.txt” is maintained by AutoConfig and normally you should not need to change any values.
ADOP Prepare Phase
Prepare phase will be create a new Online Patching Cycle ID and start with Syncronizing the File System of Run into Patch. This will be followed by creation of Patch Edition in database.
The phase has below specific parameter:
skipsyncerror=(yes|no) [default: no]
It specifies whether to ignore errors that may occur during incremental file system synchronization. This might happen if you applied a patch in the previous patching cycle that had errors but decided to continue with the cutover. When the patch is synchronized on the next patching cycle, the apply errors may occur again, but can be ignored.
After complition of Prepare Phase you can start with migration of customization to the Patch Edition File System and you can apply Application Technology Stack Patches i.e. Oracle Home (10.1.2) Patches and Weblogic Patches. This can be done until you are completed with Cutover Phase.
ADOP Apply Phase
This is the phase where in patches are actully applied.
The phase has below specific parameters:
apply=(yes|no) [default: yes]
Controls whether adop actually applies the patch. You can specify “apply=no” to run adop in test mode, where the patch will not actually be applied, and adop will record what it would have done in the log.
patches=[,…] patches=:[,:…]
This parameter specifies a comma-separated list of patches to be applied. Patches can be specified either as the patch number or by the patch directory and driver file. All patches are expected to be in the $PATCH_TOP directory on all tiers. Patches are applied serially unless the merge=yes parameter is specified.
patchtop= [default: $PATCH_TOP]
Path to a user-specified directory where patches are unzipped. The default and recommend location is the $PATCH_TOP directory automatically created by the install. When using an alternate patchtop you must ensure that the location is not within the editioned file systems (fs1, fs2) and is accessible by the same path for all nodes of a multi-node deployment.
It is used to specify how the patch will be applied. There 3 option can be explained as below:
online – It will apply a patch to the patch edition during an online patching cycle. downtime – It will apply a patch to the run edition when application services are down. When using this mode, you only run the apply phase. hotpatch – apply a patch to the run edition when application services are up. When using this mode, you only run the apply phase
In downtime mode, adop will validate that application services are shutdown before apply the patch. The patch will be applied to the run edition of the system. Downtime mode patching does not use an online patching cycle and hence if there is an online patching cycle in progress. The process of applying a patch in downtime mode completes more quickly than in online mode, but at the cost of increased system downtime.
In hotpatch mode, adop will apply the patch to the run edition of the system while application services are still running. Patches that can be safely applied in hotpatch mode (such as NLS and Online Help patches) will document this in the patch readme. Hotpatch mode cannot be used if there is an online patching cycle in progress.
merge=(yes|no) [default: no]
Indicates whether adop should merge a list of patches before applying. By default, adop will apply a list of patches serially in the order specified. You can also use AD Merge Patch to merge multiple patches ahead of the apply command.
restart=(yes|no) [default: no]
Use restart=yes to resume the previous failed apply command from where processing terminated. If an apply command fails, check the log files for further information. If the problem can be corrected, you can then restart the apply command where it left off using the restart parameter.
When restarting a failed apply it is important to use the same parameters as the failed command, with only the addition of the restart=yes parameter.
abandon=(yes|no) [default: no]
Use abandon=yes to abandon the previous failed apply command and start a new apply command. Note that any changes made to the system by the failed command will remain in effect. The abandon flag is most useful when applying a replacement patch for the failing patch. If a patch fails to apply and there is no replacement patch, you may also abort the online patching cycle. See abort phase later in this blog.
options=[,…]
Options can be specified in a comma-separated list to control advanced features when a patch is applied. These options are normally not needed unless specified by documentation or support. Note that these options can be prefixed with “no”, e.g. “nocheckfile”, to disable the behavior, and for some options “no” is the default.
checkfile [default: checkfile] – Skip running exec, SQL, and exectier commands if they are recorded as already run.
compiledb [default: compiledb] – Compile invalid objects in the database after running actions in the database driver.
compilejsp [default: compilejsp] – Compile out-of-date JSP files, if the patch has copy actions for at least one JSP file.
copyportion [default: copyportion] – Run commands found in a copy driver.
databaseportion [default: databaseportion] – Run commands found in a database driver.
generateportion [default: generateportion] – Run commands found in a generate driver.
validate [default: novalidate] – Connect to all registered Oracle E-Business Suite schemas at the start of patch application.
phtofile [default: nophtofile] – Save patch history to file
forceapply [default: noforceapply] – Reapply a patch that has already been applied. Useful in combination with “nocheckfile” option to rerun files that have already been executed.
flags=[,…]
Flags can be specified in a comma-separated list to control advanced features when applying a patch. Note that these flags can be prefixed with “no”, e.g. “nologging”, to disable the behavior and for some flags “no” is the default.
hidepw [default: hidepw] – Omit the “HIDEPW:” comments in the log file.
trace [default: notrace] – Log all database operations to a trace file.
logging [default: nologging] – Create indexes in LOGGING or NOLOGGING mode.
autoskip [default: noautoskip] – To proceed with adpatch execution even if some driver actions failed. Failed actions are recorded in a log file.
preinstall=(yes|no) [default: no]
Allows a patch to be applied to the file system without connecting to the database. Do not use this parameter unless directed by Oracle.
wait_on_failed_job=(yes|no) [default: no]
Controls whether adop apply command exits when all workers have failed. Instead of exiting, you can force adop to wait, and use the “adctrl” to retry failed jobs.
printdebug=(yes|no) [default: no]
Controls whether to display additional debugging information.
uploadph=(yes|no) [default: yes]
Controls whether to upload patch history information to database after applying the patch.
ADOP Finalize Phase
Finalize Phase is performed to keep the system ready for Cutover phase. This phase perform various activities like:
1. Compiling Invalid Objects 2. Generating driverd objects 3. Pre-compute DDL to be run during Cutover
Finalize Phase have below specific parameters:
finalize_mode=(full|quick) [default: quick]
Quick mode will provide the shortest execution time, by skipping non-essential actions. Full mode performs additional actions such as gathering statistics that may improve performance after cutover.
ADOP Cutover Phase
Cutover phase perform below activities:
1. Bring down Application services 2. Promote Patch File System to the Run File System. 3. Promote Patch Database Edition to the Run Database Edition. 4. Perform Maintenance task 5. Bring up application services
Cutover Phase have below specific parameters:
mtrestart=(yes|no) [default: yes]
Specifies whether to restart application tier servers after cutover. Leave at default unless you need to perform any manual steps during downtime.
cm_wait= [default: forever]
Specifies the number of minutes to wait for Concurrent Manager shutdown. Adop cutover starts by requesting a concurrent manager shutdown and then waits for in-progress requests to complete. If Concurrent Manager does not shutdown within the specified time limit, remaining concurrent requests will be killed and cutover will proceed.
Note that any concurrent requests killed during forced shutdown may need to be manually re-submitted after cutover. To avoid killing concurrent requests, schedule cutover at a time of minimal user activity or manually shutdown Concurrent Manager in advance of cutover.
ADOP Cleanup Phase
This phase will cleanup the Application and Database for the next Patching Cycle.
Quick mode provides the shortest execution time, by skipping non-essential actions. Standard mode performs additional processing to drop obsolete code objects from old editions. Full mode performs additional processing to drop empty database editions and unused table columns.
Cloning the Patch Edition File System
The patch edition file system is normally synchronized with the run edition file system during the prepare phase. There are some cases where it is helpful or required to manually re-clone the patch edition file system from the run edition.
1) After aborting an online patching cycle. 2) After manually changing the run edition file system. 3) After patching middle-tier technology components. 4) After applying an EBS RUP.
By re-cloning the patch edition file system, you can be certain that it is correctly synchronized, and also minimize any synchronization delay that would normally occur on the next prepare command. This can be down by below command:
adop phase=fs_clone
If there is any error you must examine log files and correct the problem, then restart the fs_clone by running the command again. User below command if fs_clone does not restart correctly and you want to force the process to restart from the beginning.
adop phase=fs_clone force=yes
Aborting an online patching cycle
If an online patching cycle encounters problems that cannot be fixed immediately you can abort the patching cycle and return to normal runtime operation. Aborting an online patching cycle can be issue as below:
adop phase=abort
Note that once you are done with Cutover phase, you can abort ADOP Cycle.
The abort command drops the database patch edition and returns the system to normal runtime state. Immediately following abort, you must also run a full cleanup and fs_clone operation to fully remove effects of the failed online patching cycle.
Dropping old database editions
As online patching cycles are completed, the system will build up a number of old database editions. When the number of old database editions reaches about 25, you should consider running a special maintenance operation to drop old database editions. This can be down as below:
This maintenance operation will take much longer than a typical online patching cycle, and should only be performed when there is no immediate need to start a new online patching cycle. The actualize all and full cleanup can be done separately as shown above, or can be executed in conjunction with an online patching cycle.
Log File Location
The adop log files are located on the non-editioned file system (fs_ne), under:
$NE_BASE/EBSapps/log/adop//__
Session
The adop utility maintains a session for each online patching cycle. A new session is created when you run the prepare phase. Each session is given a numeric ID number. The session is used to maintain the state of the online patching cycle across the various adop phases and commands. You can only run one adop session at a time on a particular Oracle E-Business Suite system
Applying patches to WebLogic Server 12c is done using the OPatch utility. Make sure any processes running under this WebLogic installation are stopped before applying a patch.
Download the latest version of OPatch and the WebLogic updates from Oracle Support and put them into the "/u01/software" directory with the other software. For example.
OPatch : p6880880_132000_Generic.zip *** See Note Below
Updates : p22331568_122100_Generic.zip
At the time of writing, the latest version of OPatch (OUI NextGen 13.2) is older than the version of OPatch that ships with WebLogic Server 12.2.1.
Assuming a newer version of OPatch were available you would unzip the OPatch utility and add it to your path.
cd /u01/software
unzip p6880880_132000_Generic.zip
export PATH=/u01/software/OPatch:$PATH
Since there isn't a newer version available at the time of writing, we will use the existing one.
export PATH=$MW_HOME/OPatch:$PATH
Unzip the patch and change to the resulting directory, then apply the patch.
unzip -d PATCH_TOP p22331568_122100_Generic.zip
cd PATCH_TOP/22331568
export ORACLE_HOME=$MW_HOME
opatch apply
Answer any prompts and take appropriate action when required.
When the patch is complete, check the WebLogic version using the following command. Depending on the scale of the patch, the version may not have changed.
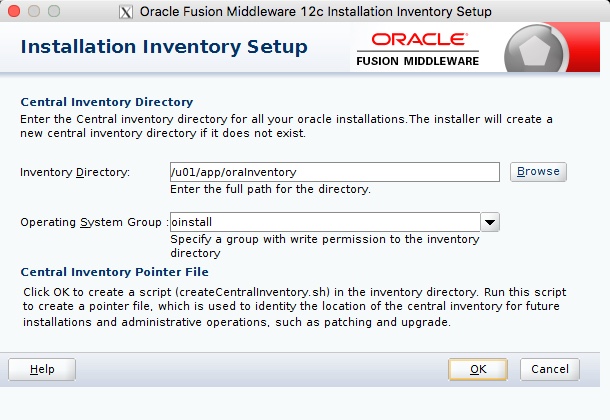
If this is is the first installation on the machine you will need to specify an inventory location. Enter the inventory location, like "/u01/app/oraInventory" and click the "OK" button.
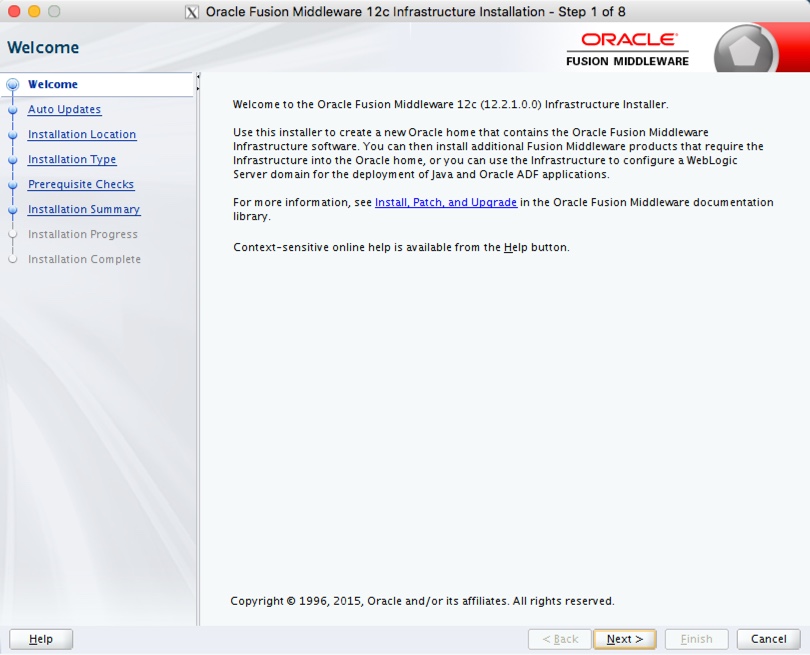
Click the "Next" button on the welcome screen.
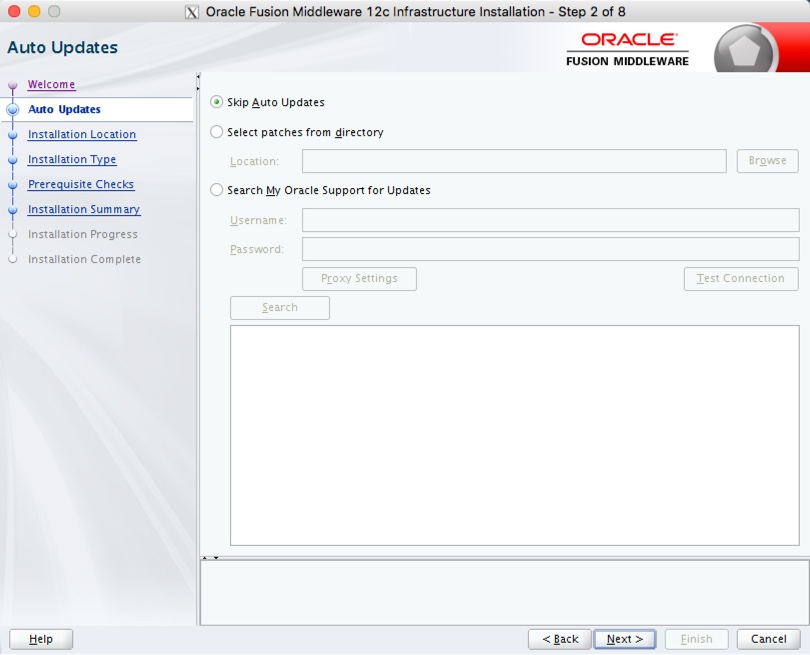
Select the "Skip Auto Updates" options, then click the "next" button.
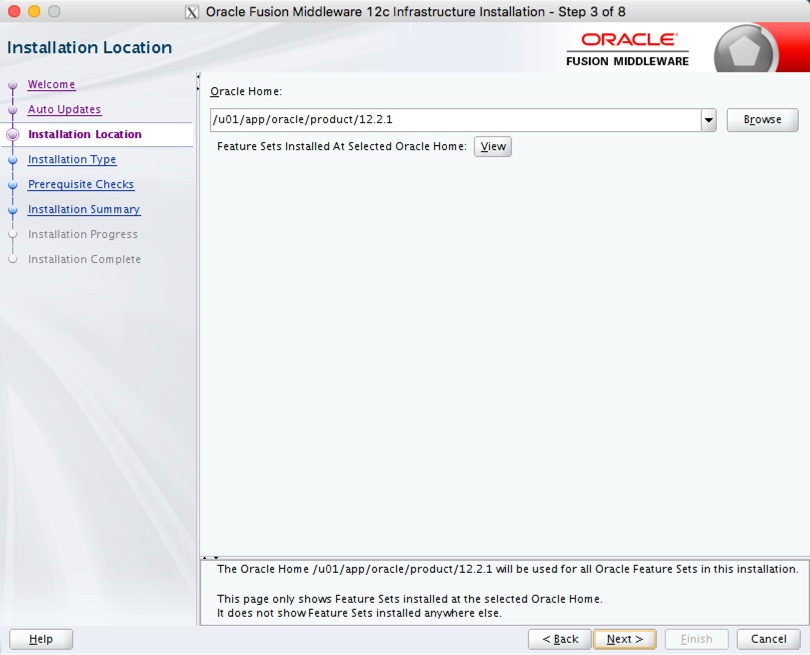
Enter the middleware home ("/u01/app/oracle/product/12.2.1") and click the "Next" button.
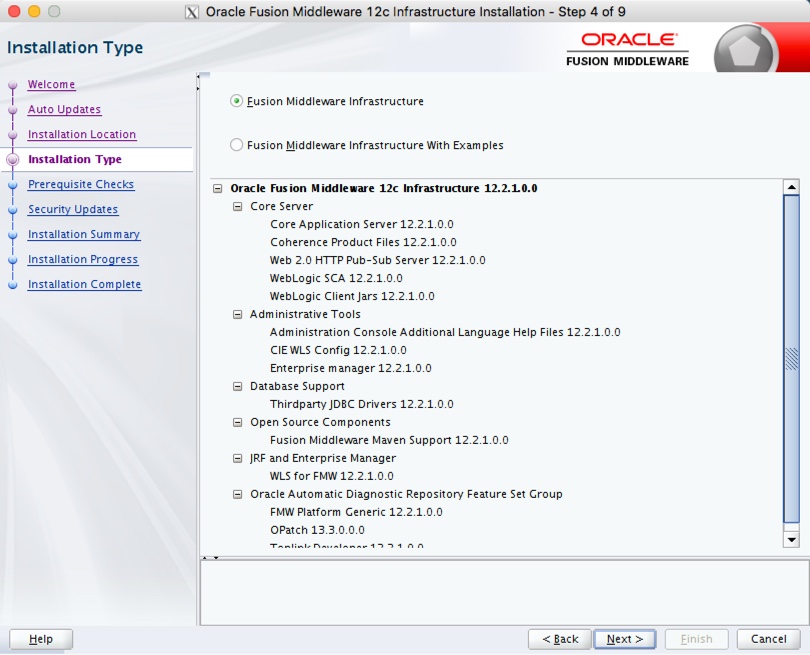
Accept the "Fusion Middleware Infrastructure" option by clicking the "Next" button.
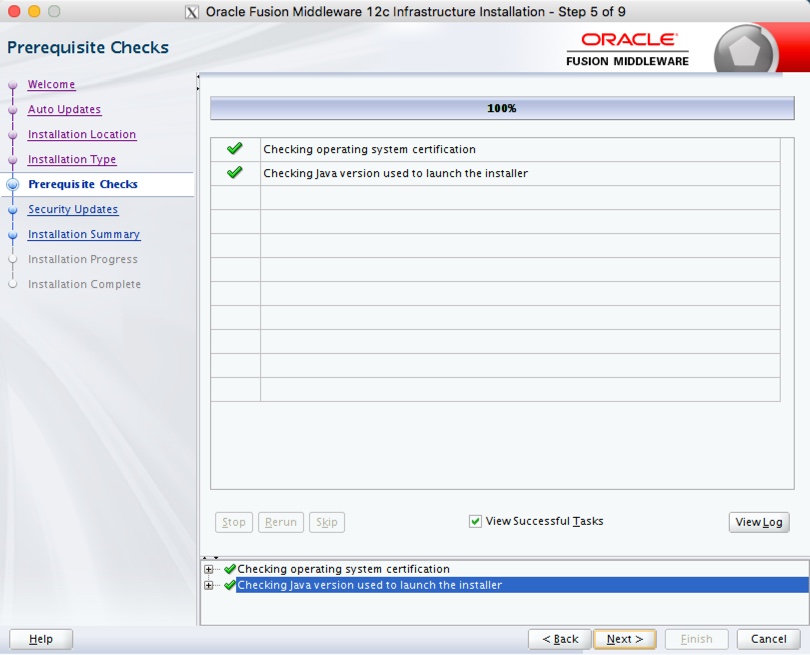
Wait for the prerequisite checks to complete. If there are failures, correct them and rerun the checks. If there are no failures, click the "Next" button.
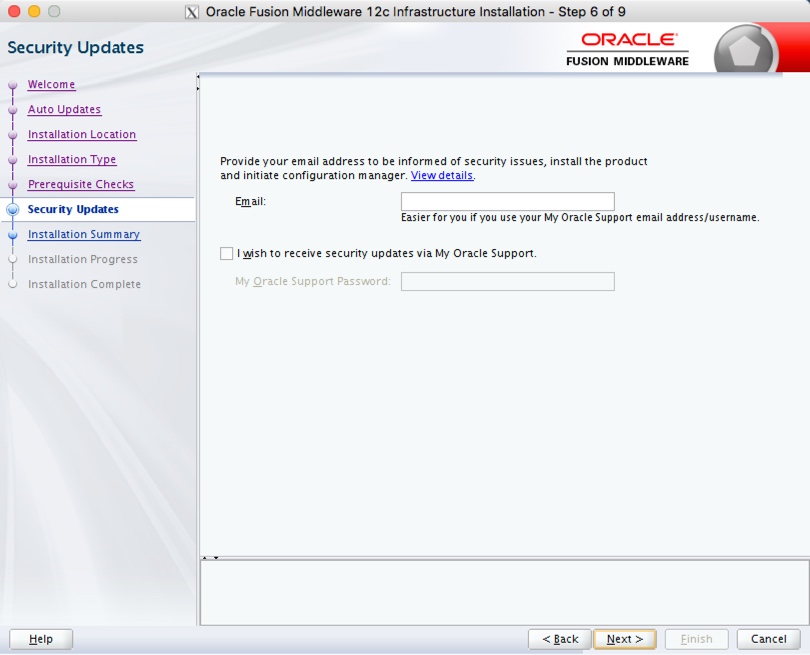
Either enter your support details, or uncheck the security updates checkbox. Click the "Next" button. If you chose not to receive security updates, click the "Yes" button on the warning dialog.
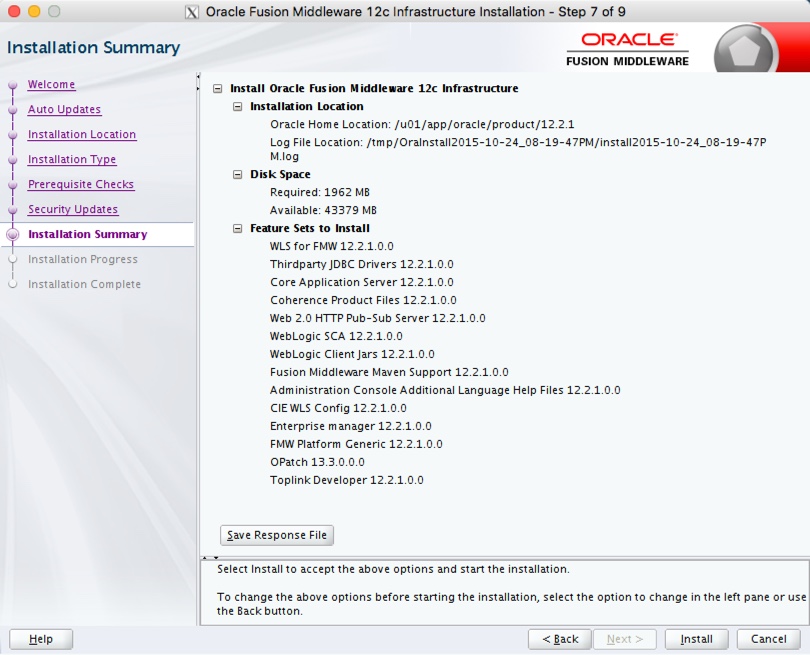
If you are happy with the summary information, click the "Install" button.
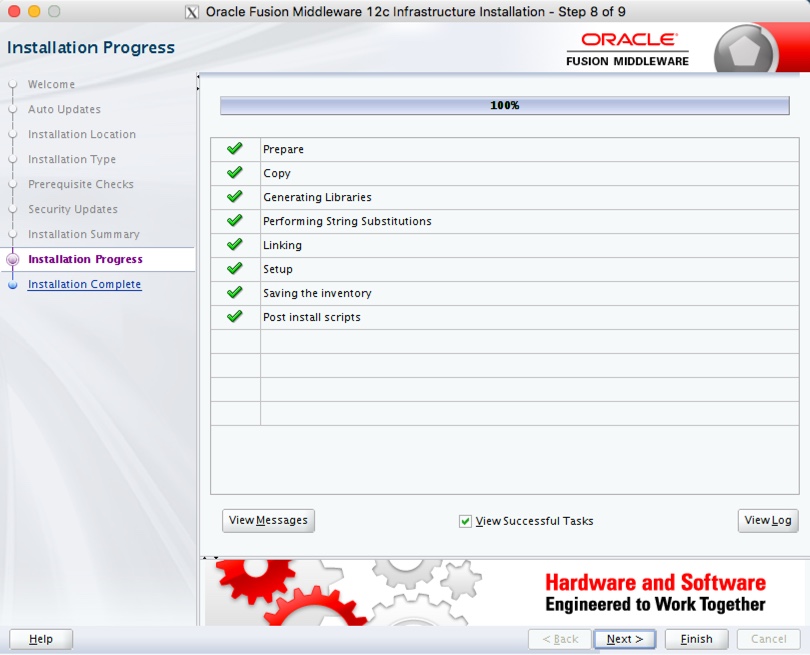
Wait for the installation to complete, then click the "Next" button.
On the installation complete screen, click the "Finish" button to launch the Configuration Wizard.
If you are doing an installation for Oracle Forms and Reports Services, you don't need to create the domain at this point, so stop here.
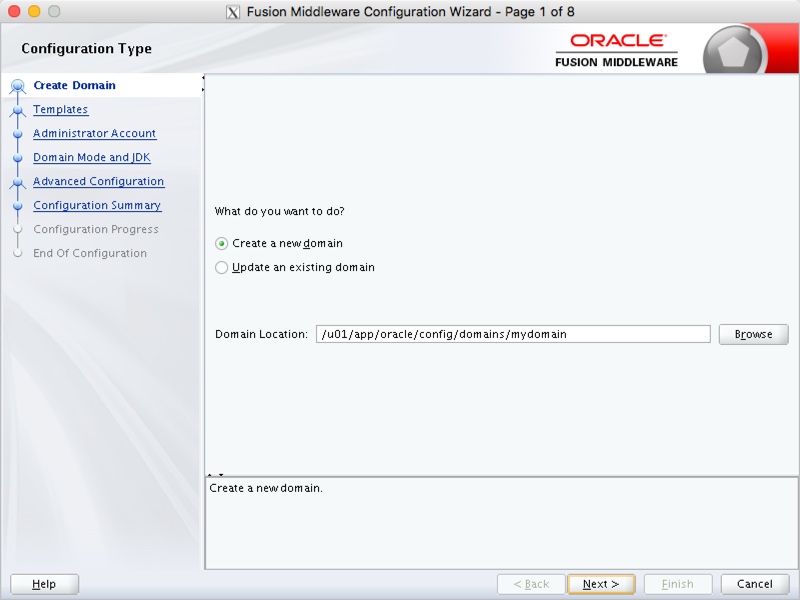
Create Domain
Launch the Configuration Wizard with the following command.
$ $ORACLE_HOME/oracle_common/common/bin/config.sh
Accept the "Create a new domain" option, enter the domain name at the end of the "Domain Location", then click the "Next" button. In this case my domain was called "mydomain", so the path I used was "/u01/app/oracle/config/domains/mydomain".
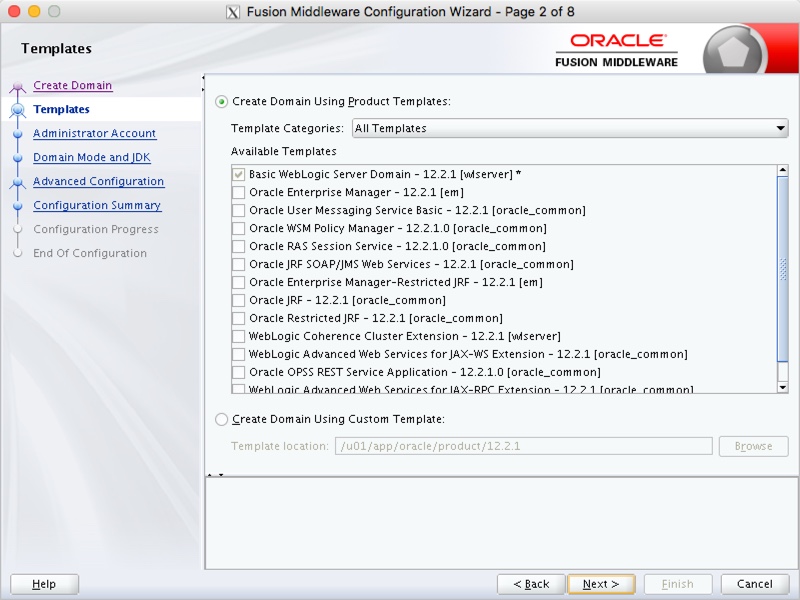
Select the required product template and click the "Next" button.
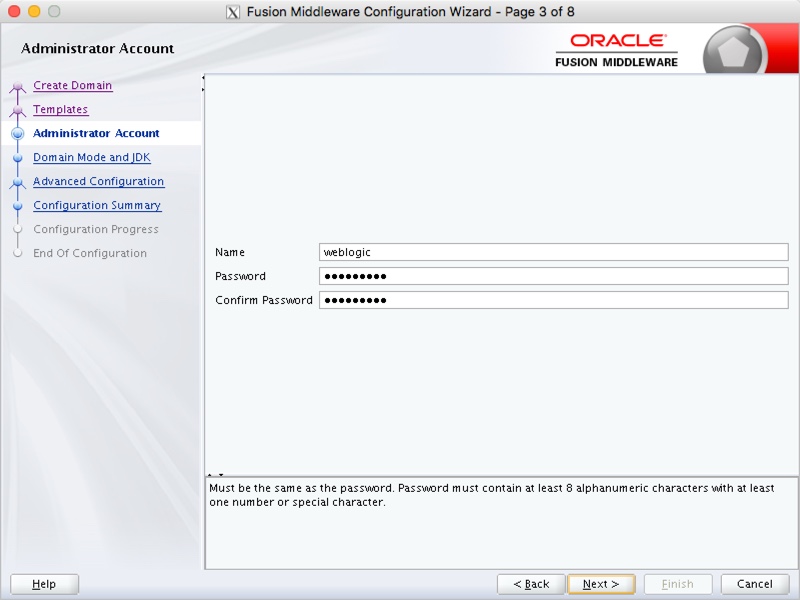
Enter the administrator credentials and click the "Next" button.
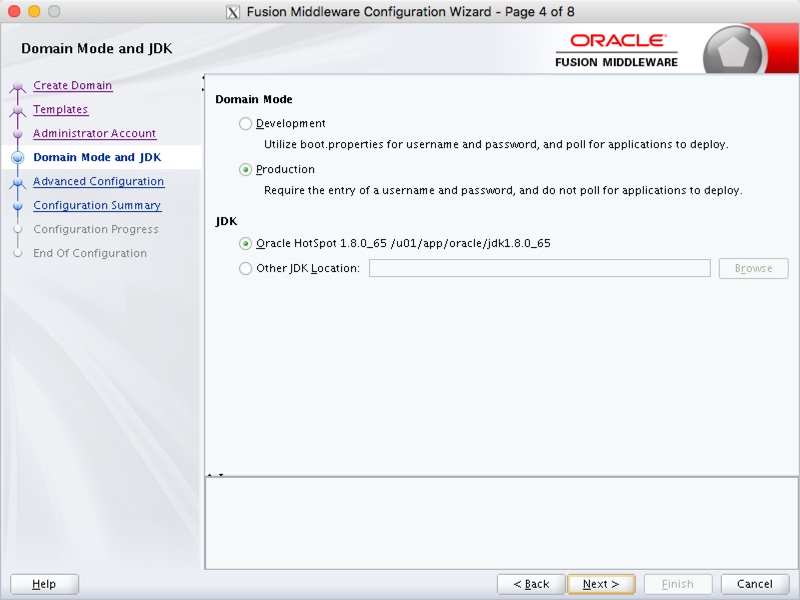
Enter the domain mode and JDK details, then click the "Next" button.
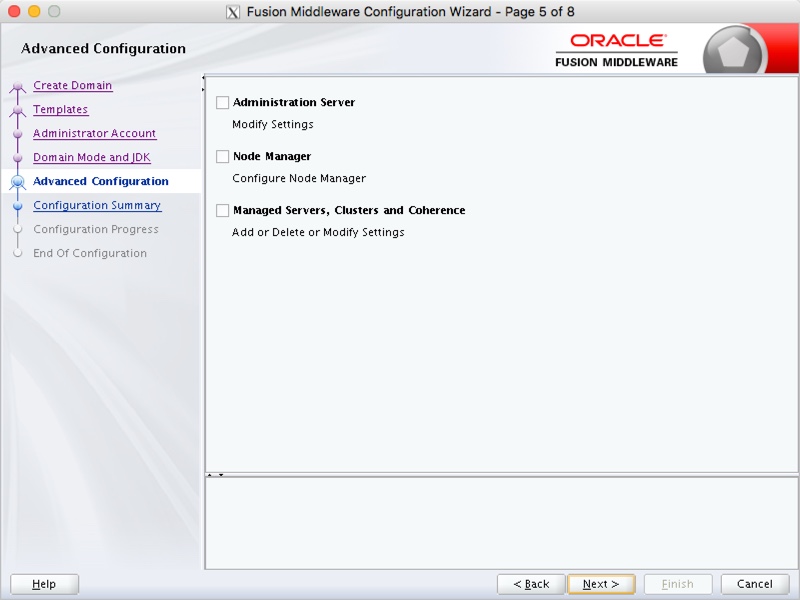
Select any required advanced configuration options. For this example I ignored the advanced configuration. Click the "Next" button.
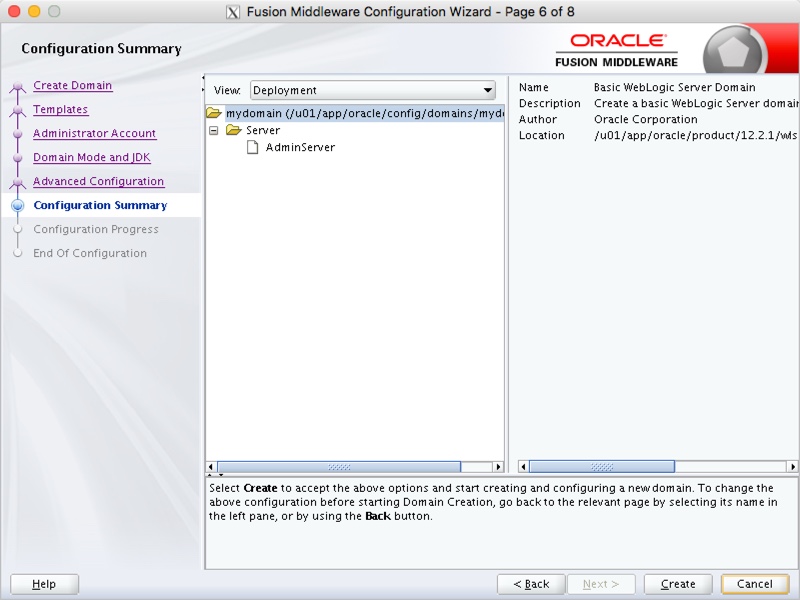
If you are happy with the configuration summary screen, click the "Create" button.
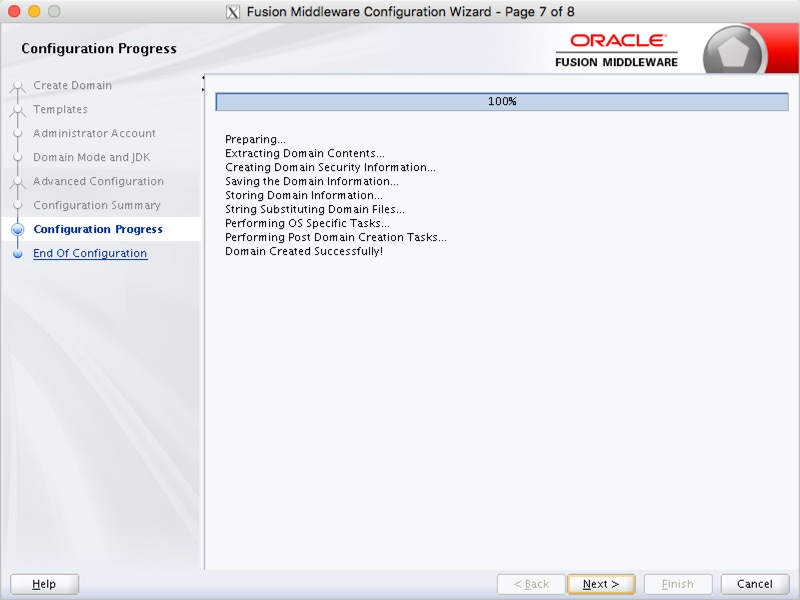
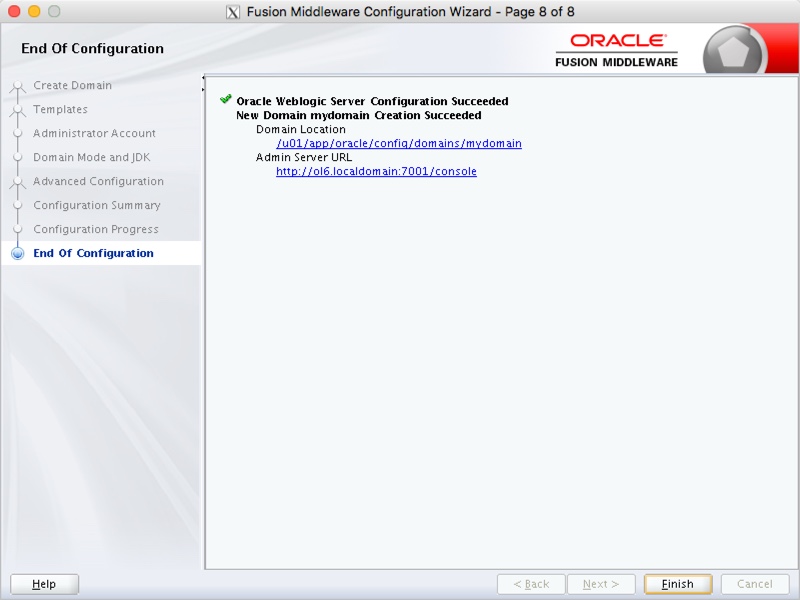
Once the domain is created, click the "Next" button.
Make a note of the Admin Server URL and click the "Finish" button.
Post-Installation
If you chose the "Production Mode" options for the domain, you will need to create a "boot.properties" file for the scripts referred to later to work without credentials. Adjust the DOMAIN_HOME and credentials appropriately.
The "$ORACLE_BASE/config/domains/mydomain" directory now contains a script that can be used to start the server. Remember to use the "&" if you want access to the commandline to be returned.
$ $DOMAIN_HOME/startWebLogic.sh &
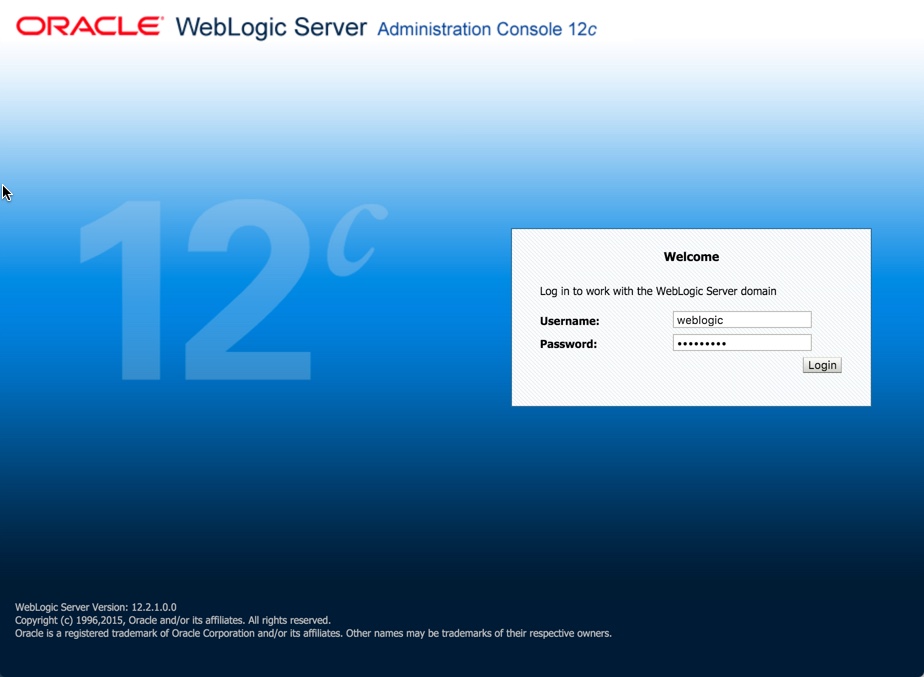
Once the server is started you can access the administrator console using the "http://hostname:port/console" URL. Log in using the username and password provided in the previous step.