Monday, June 5, 2023

DATABASE UPGRADE USING AUTOUPGRADE TOOL FROM 12c to 19c.

Oracle 19c Database was introduced in EBS R 12.2 in September 2019 and updated several additional certifications with a lot of new features and enhanced services in September 2020. Customers who are using 11g or 12c databases are already upgrading the database to 19c as it provides new features such as


Automatic Indexing

Automated Testing of Query Plans

Active Data Guard DML Redirection

Easy Connect Enhancements

Previously chargeable features now offered free of charge


 It is a feature that is enhanced in oracle 19c and it is mainly used to automate the upgrade process.it not only automates the database upgrade but also performs the pre-upgrade steps and the post upgrade steps automatically.it just simplifies the upgrade activity, previously we have to use dbua/manual method/datapump methods to upgrade the database now we can upgrade the number of databases using AutoUpgrade utility within the short span of time.

Note :   If you are doing AutoUpgrade on same server it is not necessary to run the upgrade mode you can stop with the deploy mode, our database will be upgraded.

On the other hand if you are performing AutoUpgrade on different servers it is necessary to run all the mode till upgrade mode.(i.e. analyze, fixups, deploy, upgrade)

AutoUpgrade is available for Oracle Database Enterprise Edition, and Oracle Database Standard Edition. It is not available for Oracle Database Express Edition.

AutoUpgrade Support is available for Oracle Database 12c Release 2 (12.2) and Oracle Database 18c (18.5) target homes. For both Oracle Database 12c Release 2 (12.2) and Oracle Database 18c (18.5) target homes.

Advantages of AutoUpgrade Utility:

  • Time saving method (completes the upgrade in a short time)
  • can upgrade multiple Oracle Database deployments at the same time, using a single configuration file, customized as needed for each database deployment.
  • preventing the issues before upgrade.
  • It automatically performs the preupgrade and post upgrade steps/checks.

AUTOUPGRADE PROCESSING MODES:

Generally AutoUpgrade processes in four modes, they are ,

  • Analyze

It performs a read only pre-upgrade analysis of databases before upgrade and detects any issues which may prevent the successful completion of upgradation.it should be run in the source database like normal operations.

  • Fixups

In Fixups mode it checks the same as it have done in the analyze mode, so that it can identify issues that require fixing. In Fixup Mode, the AutoUpgrade utility detects and identifies both fixes that require manual intervention and AutoUpgrade utility can clear the fixduring upgrade.

  • Deploy

In deploy mode it confirms that our database has been successfully upgraded and it copies the sqlnet.ora, listener.ora, tnsnames.ora from source to target home.

  • Upgrade

An upgrade completes with either deploy or upgrade, after this we can run our post upgrade checks.in this we can run our custom scripts on the upgraded databases in accordance with the configuration file that we have created. After this the upgraded oracle database starts with a new oracle home.

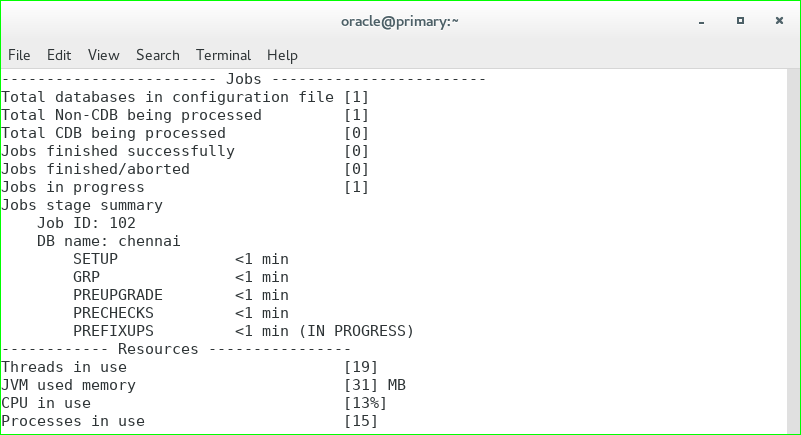
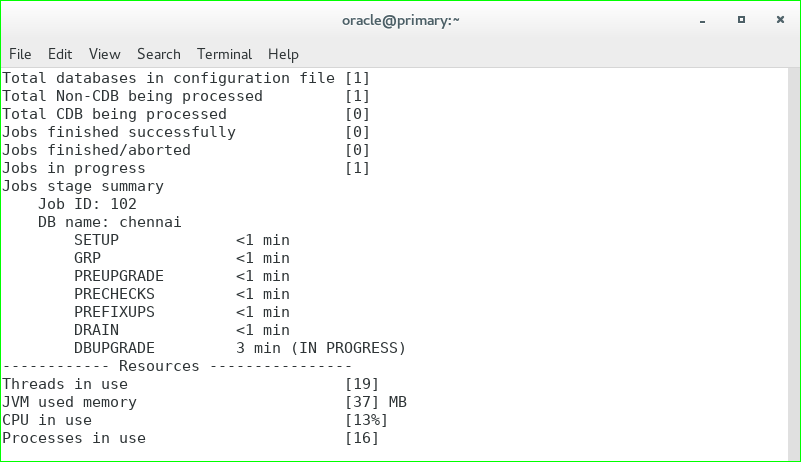
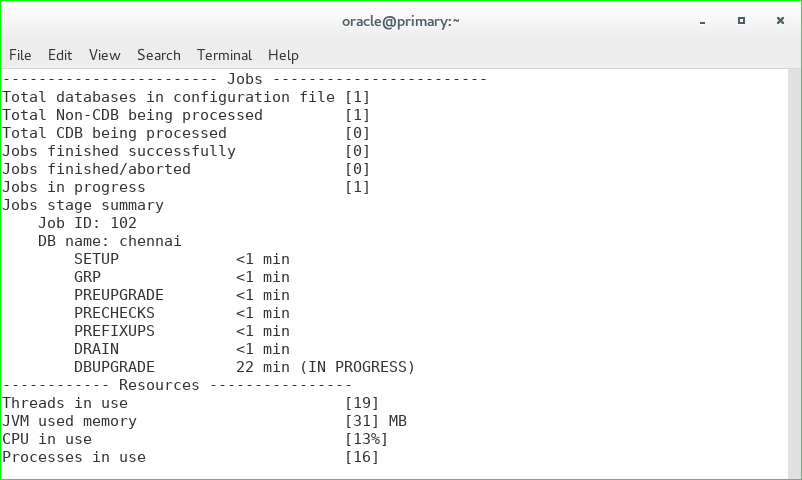
AutoUpgrade utility jobs pass through a series of phases, called stages, during which specific actions are performed.

AutoUpgrade has the following stages,

SETUP
PREUPGRADE
PRECHECKS
GRP
PREFIXUPS
DRAIN
DBUPGRADE
POSTCHECKS
POSTFIXUPS
POSTUPGRADE

Overview steps:

Step:1 Check for the autoupgrade.jar file version which is already present in the database.($ORACLE_HOME/rdbms/admin/preupgrade.jar)

Step:2 Then we have to download the latest autoupgrade.jar version and then we have to share the file in /home/oracle location and check the version of the file.

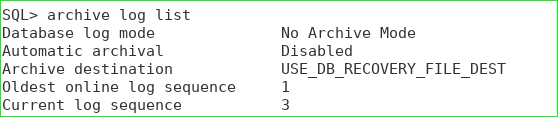
Step:3 Our database which we are going to upgrade must be in archivelog mode and flashback should be enabled.

Step:4 Create a configuration file which consists of source Sid, log directory, start time of the upgrade, target home, source db version.

Step:5 Once we run the analyze mode it checks for any issues and also it analyses the source database, it will estimate the time when the upgrade will get completed, jobs that are running, status of the jobs ,once it is completed without any error we can run the fixups mode here also the same it detects and fixes the bugs that is either by manual or bugs that is fixed automatically during upgrade.

Step:6 After this the next stage is deploy and upgrade both are same which upgrades our database, it confirms that our database is upgraded successfully. here it transfers the listener.ora, tnsnames.ora files from source home to target’s home. Then we can start our upgraded database in the new oracle home.

Step:7 Then check time zone version of upgraded database.


Step:1 Check for the autoupgrade.jar version which is already present. The autoupgrade.jar file is available in the Oracle 19c database software in the $ORACLE_HOME/rdbms/admin directory.

Step:2 Then download the latest version of autoupgrade.jar from the oracle support.

Step:3 Create the configuration files containing the parameters where the logs should be stored, dbid, database name to be upgraded, source and target version home.

Contents present in the configuration file:

#
# Global logging directory pertains to all jobs
#
global.autoupg_log_dir=/u01/app/oracle/autoupgrade        # Top level logging directory (Required)
#
# Database 1
#
upg1.dbname=chennai
upg1.source_home=/u01/app/oracle/product/12.2.0.1/dbhome_1
upg1.target_home=/u01/app/oracle/product/19.0.0/dbhome_1
upg1.sid=chennai
upg1.start_time=now
upg1.log_dir=/u01/app/oracle/autoupgrade/chennai
upg1.upgrade_node=primary.localdomain
upg1.run_utlrp=yes
upg1.timezone_upg=yes
upg1.target_version=12.2

Step:4 Enable the archive log mode in the database which is to be upgraded.

Step:5 Analyze the database to be upgraded using the analyze mode and fixups the issues by running fixups mode.

There are three main commands in this upgrade to check the status of the upgrade.

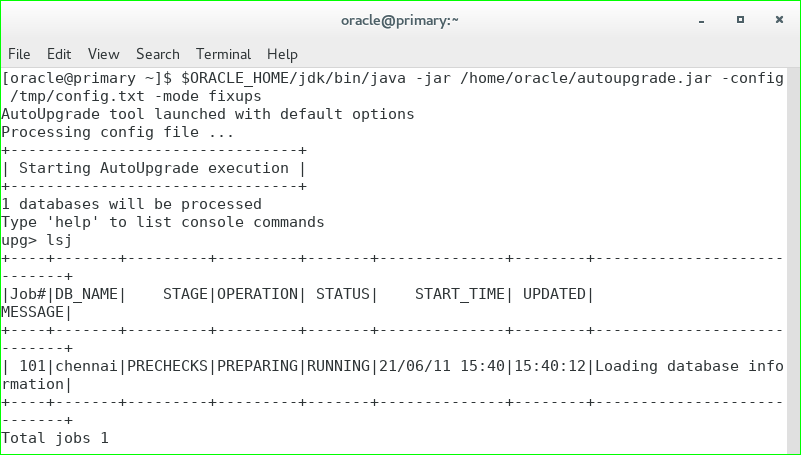
lsj       –   list the jobs which are running.

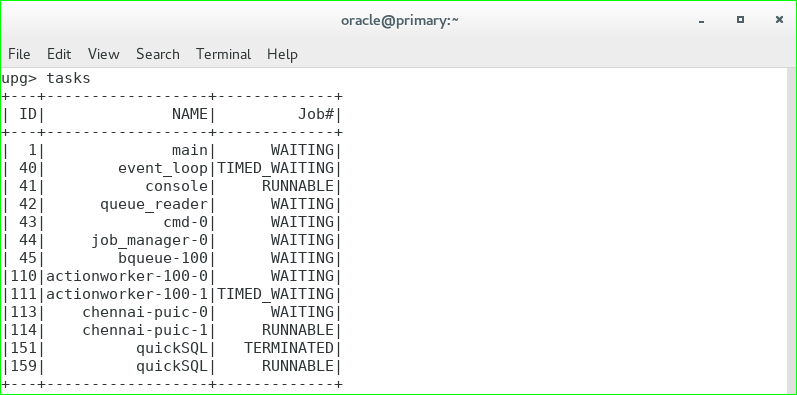
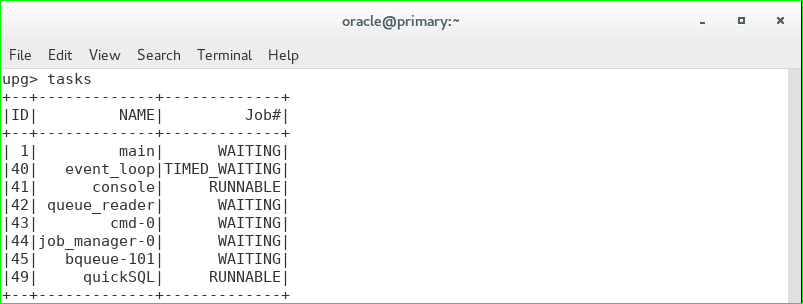
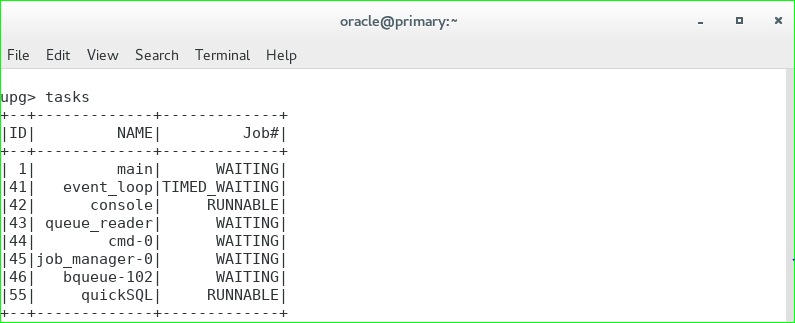
tasks  –  to see the tasks of the jobs and their status.

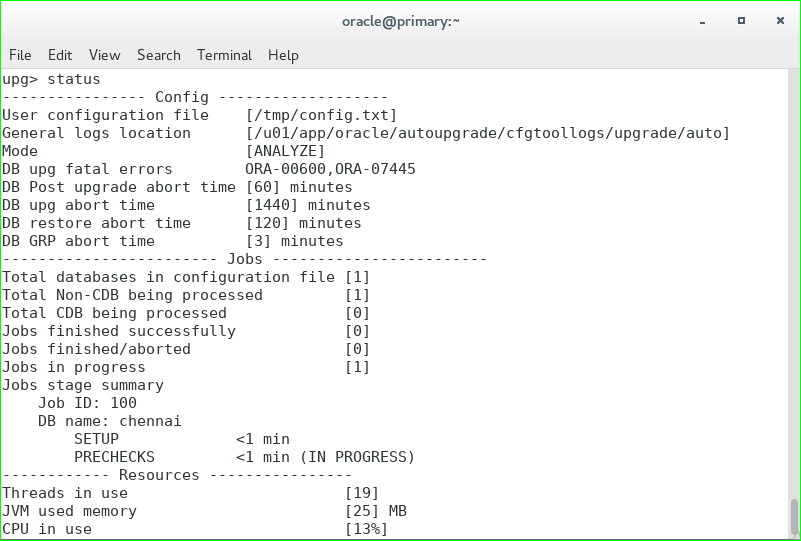
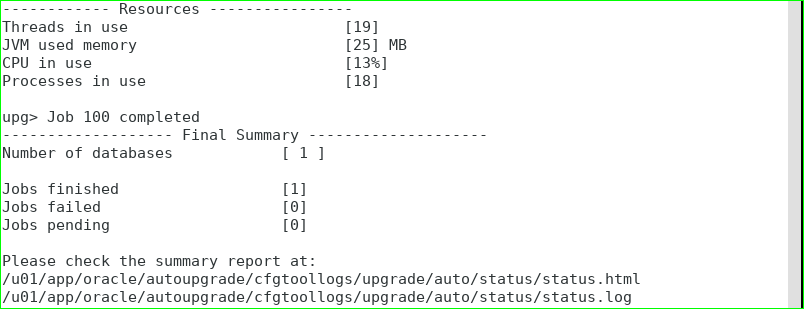
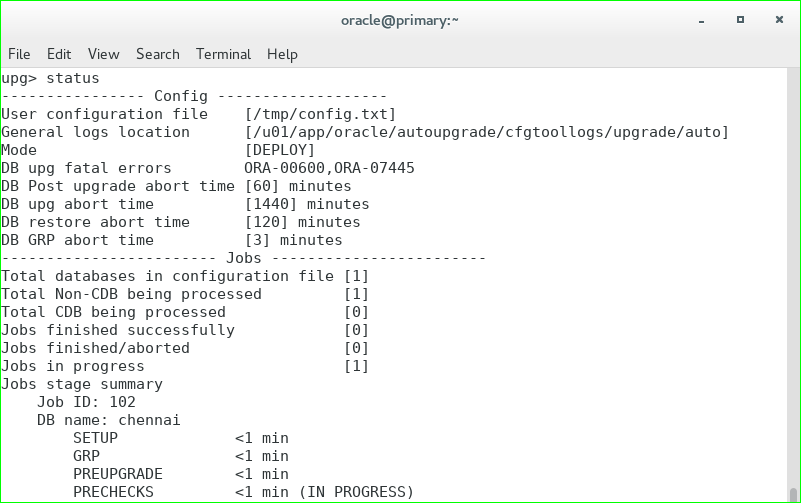
status – it gives an overall summary of the upgrade, here we can see the no of container and non-container databases, job finished successfully, job aborted and jobs which are in progress state.

Other than these there are some commands which helps you to perform the AutoUpgrade in a better way.

Running  Analyze mode:

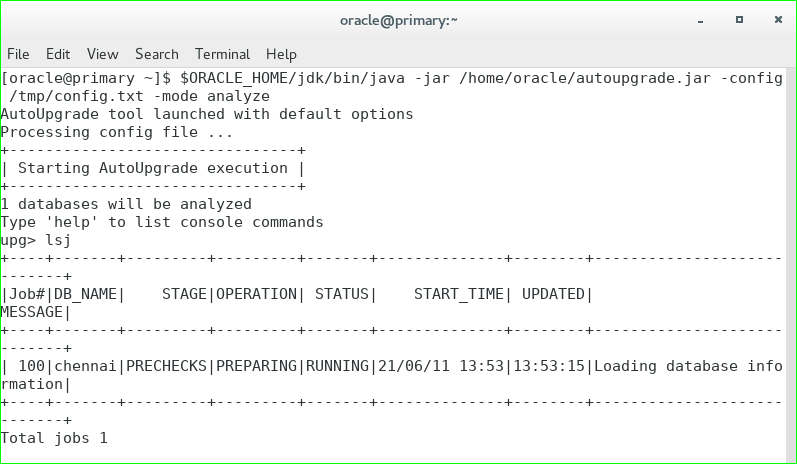
$ORACLE_HOME/jdk/bin/java -jar /home/oracle/autoupgrade.jar -config /tmp/config.txt -mode analyze

Running fixups mode:

$ORACLE_HOME/jdk/bin/java -jar /home/oracle/autoupgrade.jar -config /tmp/config.txt -mode fixups

Step:6 After these above steps are completed successfully we can proceed the upgrade process using deploy and upgrade modes.

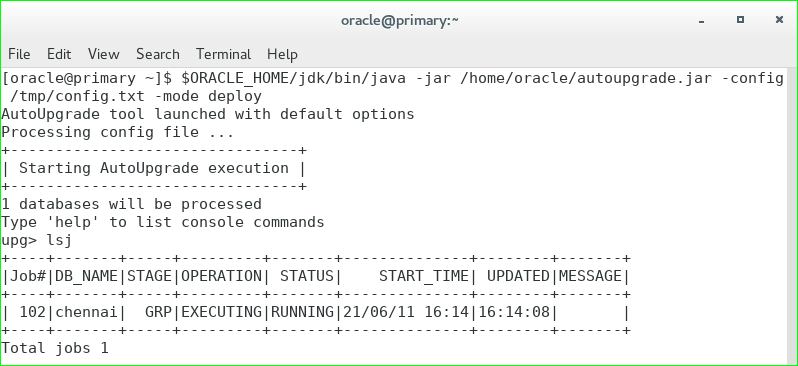
Running deploy mode:

$ORACLE_HOME/jdk/bin/java -jar /home/oracle/autoupgrade.jar -config /tmp/config.txt -mode deploy

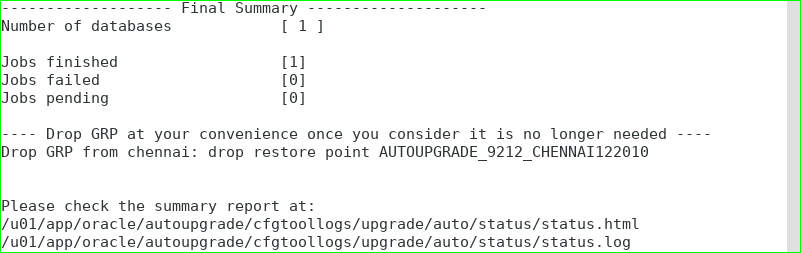
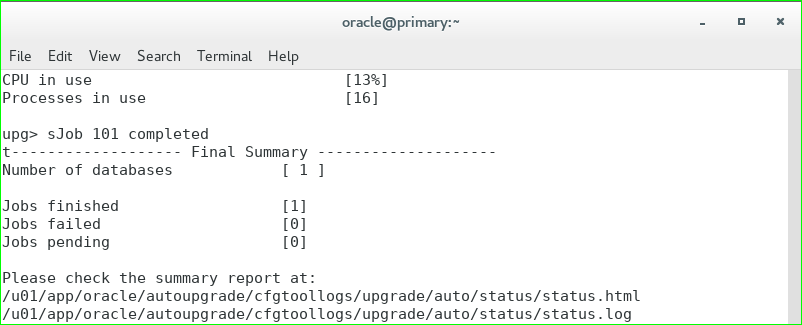
Our database is upgraded successfully from 12c to 19c using AutoUpgrade tool.

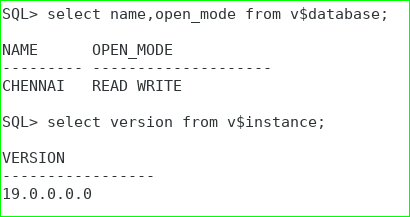
Here I am checking whether database is upgraded or not by running the 19c environment file and logging in to the database and also verify the name, open mode and timezone version.

DUPLICATE ERROR

 During the duplicate process I got this error

RMAN-06402: Oracle instance shut down
RMAN-00571: ===========================================================
RMAN-00569: =============== ERROR MESSAGE STACK FOLLOWS ===============
RMAN-00571: ===========================================================
RMAN-03002: failure of Duplicate Db command at 14/11/2022 14:08:33
RMAN-05501: aborting duplication of target database
RMAN-03015: error occurred in stored script Memory Script
RMAN-11003: failure during parse/execution of SQL statement: alter database recover logfile '+RECO/DUTS/ARCHIVELOG/2022_11_14/thread_2_seq_45.4262.1023037434'
ORA-10877: error signaled in parallel recovery slave

In alert.log

2022-11-14T14:07:52.556223-06:00
kcrf_decrypt_redokey: wallet is not opened..(err 28365) <<<< wallet is not open
Errors with log +RECO/DUTS/ARCHIVELOG/2022_11_14/thread_2_seq_45.4262.1023037434
2022-11-14T14:07:52.673668-06:00
Media Recovery failed with error 28365
Recovery interrupted!
2022-11-14T14:07:52.851222-06:00
Errors in file /u01/app/oracle/diag/rdbms/duts/DUTS/trace/DUTS_pr00_24026.trc:
ORA-00283: recovery session canceled due to errors
ORA-28365: wallet is not open

Solution

  • Copy the wallet file (ewallet.p12) from source database server to clone database server. You can check the wallet file location on source database from sqlnet.ora file of the source database ORACLE_HOME scp oracle@duts1:/u01/app/oracle/admin/DUTS/wallet/ewallet.p12 .
  • Modify sqlnet.ora file in clone database ORACLE_HOME to reflect the location of the wallet file:
ENCRYPTION_WALLET_LOCATION =
(SOURCE =
(METHOD = FILE)
(METHOD_DATA =
(DIRECTORY = /u01/app/oracle/admin/DUTS/wallet)
)
)
  • Invoke orapki utility on the clone database server to make the wallet auto-login:
orapki wallet create -wallet /u01/app/oracle/admin/DUTS/wallet -pwd "oracle" -auto_login
  • If above step is successful, you should find a new file is created in the same directory: cwallet.sso
[oracle@duts2 wallet]$ ll *.sso
-rw-rw-r-- 10 oracle oinstall 2048 Nov 14 16:11 cwallet.sso
  • STARTUP NOMOUNT the auxiliary instance and try the duplicate command.

After few minutes the problem fixed.

starting media recovery
media recovery complete, elapsed time: 00:50:00
Finished recover at 14-NOV-22
RMAN>

Change The Repository (RPD) Password in OBIEE

 How To Change The Repository (RPD) Password in OBIEE

We can Change the Oracle BI Repository Password Using the obieerpdpwdchg Utility


Use the following steps to Change The Repository (RPD) Password:


1. Navigate to the obieerpdpwdchg utility, which is located under $BI_DOMAIN_HOME/bitools/bin directory.


Type the following arguments for obieerpdpwdchg:


-I name_and_path_of_existing_repository

-O name_and_path_of_new_repository


2. Then, enter the current (old) password and the new password when prompted. The repository password must be longer than five characters and cannot be empty.


$ obieerpdpwdchg -I my_repos.rpd -O my_changed_repos.rpd


Please enter the repository password:


Please enter a new repository password:


Note that passwords are masked on the command line unless you include the -C option in the command to disable masking.


3. Use the uploadrpd command to upload the repository to Oracle BI Server.


Please see this link to - OBIEE 12c: Download and Upload Repository(RPD) Commands

ADOP-PATCHING-1.0

 ADOP Patching:


adop phases:


prepare       : Prepare the instance for online patching.

apply         : Apply patch(es) to the Patch Edition.  

finalize      : Ready the instance for cutover.  

abort         : Abort the patching cycle.  

cutover       : Promote the Patch Edition to Run Edition.   

cleanup       : Drop obsolete objects and seed data from Old Editions.

actualize_all : Actualize all objects in the Patch Edition.   

cleanup_full  : Cleanup and drop Old Editions.   

abandon       : yes|no - Abandon failed patches.


adop patch log directory:


<INSTALL BASE>/fs_ne/EBSapps/log/adop


adop patch process cycle steps:


Download any required technology patches and unzip the contents. The patch contents may be unzipped into  $NE_BASE/EBSapps/patch.


1. Prepare the system for patching. 


   source <EBS_ROOT>/EBSapps.env run


   $ adop phase=prepare 


2. Apply technology patches to the Oracle Home under the Patch f/s using the information below. 


   source <EBS_ROOT>/EBSapps.env patch 


3. Apply any Oracle E-Business Suite patches planned for this patching cycle 


   $ adop phase=apply patches=<patch_list> 


4. After all patches have been successfully applied, complete the patching cycle. 


   $ adop phase=finalize 

   $ adop phase=cutover 


Note: Below steps can be done when applications are up and running 


5. source <EBS_ROOT>/EBSapps.env run 


   $ adop phase=cleanup


6. To complete the process and synchronize the technology level between patch and run f/s. 


   $ adop phase=fs_clone


adop hotpatch steps (we cannot abort hotpatch and abondon cannot be done):


Hotpatch which can apply directly on run fs


$ adop phase=apply patches=<patch_list> hotpatch=yes


After hotpatch please run phase=cleanup and phase=fs_clone to sync the run fs with patch fs to prepare for next patching cycle


adop re-apply patch forcefully:


If we try to re-apply the patch which is already applied/exists then adop patch terminates 

with below message and by default it takes N when prompted. to overcome this we need to

re-apply patch with options=forceapply.

This Patch seems to have been applied already.

Would you like to continue anyway  [N] ? N *


$ adop phase=apply patches=<patch list> hotpatch=yes options=forceapply


adop deal with "Continue As If It Were Successful" error:


$ adop phase=apply patches=<patch list> abandon=no restart=yes flags=autoskip


To define workers in adop:


$ adop phase=apply patches=<patch list> workers=5


To define patchtop in adop:


$ adop phase=apply patches=<patch list> patchtop=<patch location base>


adop merge patch:


$ adop phase=apply patches=<patch list> merge=yes


Restarting adop From A Failed Session:


 $ adop phase=abort

 $ adop phase=cleanup cleanup_mode=full

 $ adop phase=fs_clone 


Then reapply the patch


adop apply for language patch:


$ adop phase=apply patches=18023722_ESA:u18023722.drv


adop non-interactive with patch top and define driver:


$ adop phase=apply options=nocopyportion patchtop=$XLA_TOP/patch/115 patches=driver:xla5584908.drv


adop Steps to follow to skip the failed workers:


1. Use adctrl and select option#8 (This will not be visible) to skip thefailed jobs

2. Restart adop using "restart=yes" parameter


** If the failed jobs are numerous, then better to re-start this patch once again with autoskip option.


ie.  adop restart=no abandon=yes flags=autoskip 


This command will restart the patch once again from starting onwards and will skip all the failures if any comes. But make sure to review the log file at the end of the patch application that you have skipped the failures that you want to.


Weblogic Server Smart Update Patching :


Steps to apply weblogic server smart update patch:


Refer Note: 

How to Apply WebLogic Server (WLS) Patches Using Smart Update [Video] (Doc ID 876004.1)


1.Download the patch 

2.Copy the files (for example, E5W8.jar and WGQJ.jar) and the patch-catalog_xxx.xml from the zip file to the target machine. You do not need the readme file.

Path: $FMW_HOME/utils/bsu/cache_dir


3.cd $FMW_HOME/utils/bsu


To install patch:

./bsu.sh -prod_dir=$FMW_HOME/wlserver_10.3 -patchlist=7FC9 -verbose -install


To Verify:

./bsu.sh -prod_dir=$FMW_HOME/wlserver_10.3 -status=applied -verbose -view | grep 7FC9


To Rollback:

./bsu.sh -remove -patchlist=7FC9 -prod_dir=$FMW_HOME/wlserver_10.3 -verbose


We can also apply the Smart Update patch in graphical (GUI) mode.


Steps to apply opatch on FMW Web Tier HOME :


Set the Environment as below (replace <INSTALL_BASE> path as required): 


$ export ORACLE_HOME=$FMW_HOME/webtier

$ export PATH=$ORACLE_HOME/OPatch:$PATH


$ opatch lsinventory 


Apply opatch:


$ opatch apply


Steps to apply opatch on FMW oracle_common HOME :


Set the Environment as below:


$ export ORACLE_HOME=$FMW_HOME/oracle_common

$ export PATH=$ORACLE_HOME/OPatch:$PATH


$ opatch lsinventory 


Apply opatch:


$ opatch apply


Queries :


Query to check if a patch is applied in Oracle EBS R12.2.x:


In Oracle E Business Suite (ebs erp) R12.2.x you cannot query the AD_BUGS table to check if patches have been applied..

The AD_BUGS table may have entries for patches that were applied but later the patching cycle was aborted (not really applied).


The way to check whether a patch is really applied is to use the AD_PATCH.IS_PATCH_APPLIED PL/SQL function.


Usage:


select AD_PATCH.IS_PATCH_APPLIED(\'$release\',\'$appltop_id\',\'$patch_no\',\'$language\') 

from dual;


Example sql:


SELECT adb.bug_number,ad_patch.is_patch_applied('11i', 1045, adb.bug_number)

FROM ad_bugs adb

WHERE adb.bug_number in (20034256);


or for single app tier installations:


select ad_patch.is_patch_applied('R12',-1,20034256) from dual;


Expected results:


EXPLICIT = applied

NOT APPLIED = not applied / aborted


Note: If you are sure patch is applied, but showing as not applied then do the following workaround.


1. Start adadmin after source the RUN FS env.

2. Select "2. Maintain Applications Files menu" in "AD Administration Main Menu".

3. In "Maintain Applications Files", select "4. Maintain snapshot information".

4. Select "2. Update current view snapshot" in the "Maintain Snapshot Information".

5. Select "1. Update Complete APPL_TOP" in the "Maintain Current View Snapshot Information".


Query to check current AD patchset:


SELECT a.application_short_name, b.patch_level

FROM fnd_application_vl a,fnd_product_installations b

WHERE a.application_id = b.application_id

  and application_short_name = 'AD';


Query to check patches applied correctly and in the expected sequence:


1.1.Run this sql statement:


   select * from ad_adop_session_patches order by end_date desc;


1.2. Run this piece of sql code:


   set pagesize 200;

   set linesize 160;

   column adop_session_id format 999999999999;

   column bug_number format a15;

   column status format a15;

   column applied_file_system_base format a23;

   column patch_file_system_base format a23;

   column adpatch_options format a15;

   column node_name format a15;

   column end_date format a15;

   column clone_status format a15;


   select ADOP_SESSION_ID, BUG_NUMBER, STATUS, APPLIED_FILE_SYSTEM_BASE, PATCH_FILE_SYS   TEM_BASE, ADPATCH_OPTIONS, NODE_NAME, END_DATE, CLONE_STATUS

   from ad_adop_session_patches

   order by end_date desc;


Below are possible values of STATUS column:

N - Not Applied In the current node but applied in other nodes

R - Patch Application is going on.

H - Patch failed in the middle. (Hard Failure)

F - Patch failed in the middle but user tried to skip some failures.

S - Patch Application succeeded after skipping the failed jobs.

Y - Patch Application succeeded.

C - Reserved for clone and config_clone. Indicates clone completed


Query to Check AD and TXK C Patch levels:


SELECT codelevel FROM AD_TRACKABLE_ENTITIES WHERE abbreviation in ('txk','ad');