Thursday, September 28, 2023

sys username and password invalid

 SYS USERNAME and PASSWORD INVALID:


check select * from v$pwfile_users;

it should give value for sys user if not create password file in $ORACLE_HOME/dbs


cd  <ORACLE_HOME>/dbs

CREATE PASSWORD FILE

$ORACLE_HOME/bin/orapwd file=<OH>/dbs/orapw<sid> password=<password> entries=<max entries number>;


Using the sys user and the password which is set in the password file to logging into the dbconsole

Make sure the DB parameter REMOTE_LOGIN_PASSWORDFILE=EXCLUSIVE

SQL> show parameter REMOTE_LOGIN_PASSWORDFILE

NAME                                   TYPE     VALUE
------------------------------------ -----------  ------------------------------
remote_login_passwordfile       string       EXCLUSIVE


check    sqlnet.ora below enters: 

# sqlnet.ora Network Configuration File: /data/app/oracle/product/12.1.0/dbhome_1/network/admin/sqlnet.ora

# Generated by Oracle configuration tools.


NAMES.DIRECTORY_PATH= (TNSNAMES, EZCONNECT)


SQLNET.EXPIRE_TIME=10


NAMES.DIRECTORY_PATH= (TNSNAMES, EZCONNECT)

SQLNET.ALLOWED_LOGON_VERSION_SERVER=8

SQLNET.ALLOWED_LOGON_VERSION_CLIENT=8


now login with sys user it should login.


Tuesday, September 19, 2023

Setup glogin.sql


Setup glogin.sql in Oracle


Setup glogin.sql in Oracle

Let's take you want to execute some sql commands every time you login to SQL*PLUS. It would be so hard to run those commands manually whenever you start SQL*PLUS. With glogin.sql you can specify the commands you want to run every time you invoke SQL*PLUS.


Any query, script, parameter, PL/SQL code etc, you can simply put under glogin.sql file and SQL*PLUS will first execute glogin.sql before allowing you to query database.


I would like to display below message every time a user logs into the database


SQL*Plus: Release 12.1.0.2.0 Production on Tue Sep 19 14:47:05 2023


Copyright (c) 1982, 2014, Oracle.  All rights reserved.


Connected to:

Oracle Database 12c Enterprise Edition Release 12.1.0.2.0 - 64bit Production

With the Partitioning, OLAP, Advanced Analytics and Real Application Testing options


Hello

------------------------------------------------

Welcome, you are connected to MOMDEV database


setup glogin.sql in oracle - testdb database 

Open the glogin.sql file

vi $ORACLE_HOME/sqlplus/admin/glogin.sql


Put below query at the end of the file

select 'Welcome, you are connected to '||name||' database' "Hello" from v$database;

Save and close. That's it, now whenever you login to SQL*PLUS, you will be greeted with a nice welcome message!


Thursday, September 7, 2023

start weblogic managed server

 vi start-domain.sh


# -----------------------------------------------------------------------------------

# File Name    : start-domain.sh

# Author       : AMIR DBA

# Description  : Starts a WebLogic domain and managed server.

# Call Syntax  : ./start-domain.sh

# Notes        : Amend DOMAIN_HOME and managed server name appropriately.

# -----------------------------------------------------------------------------------


export MW_HOME=/u01/app/oracle/middleware

export DOMAIN_HOME=$MW_HOME/user_projects/domains/clusterDomain


echo "Starting AdminServer"

nohup $DOMAIN_HOME/startWebLogic.sh > /dev/null 2>&1 &

sleep 120


echo "Starting clusterServer_1"

nohup $DOMAIN_HOME/bin/startManagedWebLogic.sh clusterServer_1 > /dev/null 2>&1 &

sleep 60


echo "Done!"

stop weblogic managed server

vi stop-domain.sh


 # -----------------------------------------------------------------------------------

# File Name    : stop-domain.sh

# Author       : AMIR DBA

# Description  : Stops a WebLogic domain and managed server.

# Call Syntax  : ./stop-domain.sh

# Notes        : Amend DOMAIN_HOME and managed server name appropriately.

# -----------------------------------------------------------------------------------


export MW_HOME=/u01/app/oracle/middleware

export DOMAIN_HOME=$MW_HOME/user_projects/domains/clusterDomain


echo "Stopping clusterServer_1"

$DOMAIN_HOME/bin/stopManagedWebLogic.sh clusterServer_1


echo "Stopping AdminServer"

$DOMAIN_HOME/bin/stopWebLogic.sh


echo "Tidy up temp files"

find $DOMAIN_HOME/servers -name "*.lok" -exec rm -f {} \;

find $DOMAIN_HOME/servers -name "*.DAT" -exec rm -f {} \;


echo "Done!"

Monday, September 4, 2023

What if I add data files or create tablespace in snapshot standby database Oracle 19c


What if I add data files or create tablespace in snapshot standby database Oracle 19c


Note : new tablespace or datafile will b droped if you change standby to physical database 


Check the database role. Execute below command in snapshot standby database.

SQL>  select name,open_mode,database_role,controlfile_type from v$database;

NAME OPEN_MODE    DATABASE_ROLE    CONTROL
---- ------------ ---------------- -------
PR   READ WRITE   SNAPSHOT STANDBY CURRENT

Capture the data file details with tablespace names before performing any testing.

SQL> col name for a60
SQL> select ts#,file#,name File_Name,bytes/1024/1024 File_Size_MB from v$datafile order by 1;

TS# FILE# FILE_NAME                                      FILE_SIZE_MB
--- ----- ---------------------------------------------  ------------
  0     1 D:\TESTDB\SETUPS\STANDBY\DB\DR\SYSTEM01.DBF            1180
  1     3 D:\TESTDB\SETUPS\STANDBY\DB\DR\SYSAUX01.DBF             990
  2     4 D:\TESTDB\SETUPS\STANDBY\DB\DR\UNDOTBS01.DBF            440
  4     7 D:\TESTDB\SETUPS\STANDBY\DB\DR\USERS01.DBF                5

SQL> select ts#,name from v$tablespace order by 1;

TS# NAME
--- ---------
  0 SYSTEM
  1 SYSAUX
  2 UNDOTBS1
  3 TEMP
  4 USERS

Now create new tablespace TEST_FLB in snapshot standby database and add some data files in this tablespace or any existing tablespace. You can also resize existing data files or create any table.

SQL> create tablespace TEST_FLB datafile 'D:\TESTDB\SETUPS\STANDBY\DB\DR\TEST_FLB01.dbf' size 1g;

Tablespace created.

SQL> alter tablespace TEST_FLB add datafile 'D:\TESTDB\SETUPS\STANDBY\DB\DR\TEST_FLB02.dbf' size 1g;

Tablespace altered.

SQL> alter database datafile 'D:\TESTDB\SETUPS\STANDBY\DB\DR\TEST_FLB02.dbf' resize 3g;

Database altered.

SQL> create table customer (cust_id number(10), cust_name varchar2(14)) tablespace TEST_FLB;

Table created.

SQL> insert into customer values(1,'A');

1 row created.

SQL>  insert into customer values(2,'B');

1 row created.

SQL>  insert into customer values(3,'C');

1 row created.

SQL>  insert into customer values(4,'D');

1 row created.

SQL>  insert into customer values(5,'E');

1 row created.

SQL>  commit;

Commit complete.

SQL> select * from customer;

   CUST_ID CUST_NAME
---------- --------------
         1 A
         2 B
         3 C
         4 D
         5 E

Snapshot Standby Alert Log File:
2023-09-02T20:53:49.598851+05:30
create tablespace TEST_FLB datafile 'D:\TESTDB\SETUPS\STANDBY\DB\DR\TEST_FLB01.dbf' size 1g
2023-09-02T20:53:51.052190+05:30
Completed: create tablespace TEST_FLB datafile 'D:\TESTDB\SETUPS\STANDBY\DB\DR\TEST_FLB01.dbf' size 1g
2023-09-02T20:53:53.860701+05:30
alter tablespace TEST_FLB add datafile 'D:\TESTDB\SETUPS\STANDBY\DB\DR\TEST_FLB02.dbf' size 1g
2023-09-02T20:53:55.967650+05:30
Completed: alter tablespace TEST_FLB add datafile 'D:\TESTDB\SETUPS\STANDBY\DB\DR\TEST_FLB02.dbf' size 1g
2023-09-02T20:53:57.391041+05:30
alter database datafile 'D:\TESTDB\SETUPS\STANDBY\DB\DR\TEST_FLB02.dbf' resize 3g
2023-09-02T20:53:59.654427+05:30
Resize operation completed for file# 2, fname D:\TESTDB\SETUPS\STANDBY\DB\DR\TEST_FLB02.DBF, old size 1048576K, new size 3145728K
Completed: alter database datafile 'D:\TESTDB\SETUPS\STANDBY\DB\DR\TEST_FLB02.dbf' resize 3g
2023-09-02T20:54:26.785953+05:30

You can check the data file and tablespace details by querying below command:

SQL> col name for a60
SQL> select ts#,file#,name File_Name,bytes/1024/1024 File_Size_MB from v$datafile order by 1;

TS# FILE# FILE_NAME                                     FILE_SIZE_MB
--- ----- --------------------------------------------- ------------
  0     1 D:\TESTDB\SETUPS\STANDBY\DB\DR\SYSTEM01.DBF           1180
  1     3 D:\TESTDB\SETUPS\STANDBY\DB\DR\SYSAUX01.DBF            990
  2     4 D:\TESTDB\SETUPS\STANDBY\DB\DR\UNDOTBS01.DBF           440
  4     7 D:\TESTDB\SETUPS\STANDBY\DB\DR\USERS01.DBF               5
  6     5 D:\TESTDB\SETUPS\STANDBY\DB\DR\TEST_FLB01.DBF         1024
  6     2 D:\TESTDB\SETUPS\STANDBY\DB\DR\TEST_FLB02.DBF         3072

6 rows selected.

SQL> select ts#,name from v$tablespace order by 1;

TS# NAME
--- -----------
  0 SYSTEM
  1 SYSAUX
  2 UNDOTBS1
  3 TEMP
  4 USERS
  6 TEST_FLB

6 rows selected.

Now suppose, your testing is done and your plan is to convert back the snapshot standby database into physical standby database then perform below steps.

SQL> shut immediate;
Database closed.
Database dismounted.
ORACLE instance shut down.

SQL> startup mount
ORACLE instance started.

Total System Global Area 2147482432 bytes
Fixed Size                  9030464 bytes
Variable Size             452984832 bytes
Database Buffers         1677721600 bytes
Redo Buffers                7745536 bytes
Database mounted.

SQL> select name,db_unique_name,open_mode,database_role,protection_mode,controlfile_type from v$database;

NAME DB_UNIQUE_NAME OPEN_MODE DATABASE_ROLE    PROTECTION_MODE     CONTROL
---- -------------- --------- ---------------- ------------------- -------
PR   DR             MOUNTED   SNAPSHOT STANDBY MAXIMUM PERFORMANCE CURRENT


SQL> alter database convert to physical standby;

Database altered.

Once you execute the above "convert to physical standby" command, it will delete the data files and drop the tablespaces created in snapshot standby database which means all the changes are discarded once you execute the "convert to physical standby" command.  

Snapshot Standby Database Alert Log File:
2023-09-02T20:58:39.261800+05:30
alter database convert to physical standby
2023-09-02T20:58:39.482013+05:30
Flashback Restore Start
Deleted file D:\TESTDB\SETUPS\STANDBY\DB\DR\TEST_FLB02.DBF
Flashback: deleted datafile #2 in tablespace #6 of pdb #0 from control file.
Deleted file D:\TESTDB\SETUPS\STANDBY\DB\DR\TEST_FLB01.DBF
Flashback: deleted datafile #5 in tablespace #6 of pdb #0 from control file.
Flashback: dropped tablespace #6: 'TEST_FLB' of pdb #0 from the control file.
Flashback Restore Complete
Drop guaranteed restore point 
Stopping background process RVWR
2023-09-02T20:58:41.228496+05:30
Deleted Oracle managed file D:\TESTDB\SETUPS\STANDBY\FLB\DR\FLASHBACK\O1_MF_LH6NTGC1_.FLB
Deleted Oracle managed file D:\TESTDB\SETUPS\STANDBY\FLB\DR\FLASHBACK\O1_MF_LH6NTKCV_.FLB
Guaranteed restore point  dropped
2023-09-02T20:58:41.275867+05:30
.... (PID:18848): Database role cleared from SNAPSHOT STANDBY [kcvs.c:8969]
Clearing standby activation ID 2841025717 (0xa9569cb5)
The primary database controlfile was created using the
'MAXLOGFILES 16' clause.
There is space for up to 13 standby redo logfiles
Use the following SQL commands on the standby database to create
standby redo logfiles that match the primary database:
ALTER DATABASE ADD STANDBY LOGFILE 'srl1.f' SIZE 209715200;
ALTER DATABASE ADD STANDBY LOGFILE 'srl2.f' SIZE 209715200;
ALTER DATABASE ADD STANDBY LOGFILE 'srl3.f' SIZE 209715200;
ALTER DATABASE ADD STANDBY LOGFILE 'srl4.f' SIZE 209715200;
.... (PID:18848): Database role changed from PRIMARY to PHYSICAL STANDBY [kcvs.c:8974]
.... (PID:18848): RT: Role transition work is not done
.... (PID:18848): Redo network throttle feature is disabled at mount time
Physical Standby Database mounted.
2023-09-02T20:58:41.386798+05:30
In-memory operation on ADG is currently only supported on Engineered systems and PaaS.
inmemory_adg_enabled is turned off automatically.
Please contact our support team for EXADATA solutions
CONVERT TO PHYSICAL STANDBY: Complete - Database mounted as physical standby
Completed: alter database convert to physical standby

You can also verify by executing below query to ensure newly created tablespace or added data files are not a part of the database now.

SQL> set lines 300 pages 3000
SQL> select name,db_unique_name,open_mode,database_role,protection_mode,controlfile_type from v$database;

NAME DB_UNIQUE_NAME OPEN_MODE DATABASE_ROLE    PROTECTION_MODE     CONTROL
---- -------------- --------- ---------------- ------------------- -------
PR   DR             MOUNTED   PHYSICAL STANDBY MAXIMUM PERFORMANCE STANDBY


SQL> col name for a60
SQL> select ts#,file#,name File_Name,bytes/1024/1024 File_Size_MB from v$datafile order by 1;

TS# FILE# FILE_NAME                                    FILE_SIZE_MB
--- ----- -------------------------------------------- ------------
  0     1 D:\TESTDB\SETUPS\STANDBY\DB\DR\SYSTEM01.DBF          1180
  1     3 D:\TESTDB\SETUPS\STANDBY\DB\DR\SYSAUX01.DBF           990
  2     4 D:\TESTDB\SETUPS\STANDBY\DB\DR\UNDOTBS01.DBF          440
  4     7 D:\TESTDB\SETUPS\STANDBY\DB\DR\USERS01.DBF              5

SQL> select ts#,name from v$tablespace order by 1;

TS# NAME
--- ----------
  0 SYSTEM
  1 SYSAUX
  2 UNDOTBS1
  3 TEMP
  4 USERS

Thursday, August 10, 2023

INSTALL AND CONFIGURE HTTPD

INSTALL AND CONFIGURE HTTPD, ENABLE PUT METHOD:


Here we will see how to install HTTPD(apache server) and enable PUT Method for curl to upload file.

IN this doc we are installing  linux server my server is Linux OEL 7

[root@server ~]# cat /etc/os-release

NOW, we are connecting to root user to install HTTPD

Su - root

yum install httpd ( it will download and install httpd)

systemctl enable httpd (it will enable httpd)

systemctl start httpd (it will start httpd)

check the status of server


Now check with your  URL http://IP or Hostname

e.g. http://192.168.50.90


NOTE : to access the http server from different server we need to enable a port 80

List out the port which are open in my server

firewall-cmd --list-all

First iam adding a port in my server then need to restart firewall for reflect of my port


firewall-cmd --add-port=80/tcp –permanent

firewall-cmd –reload

firewall-cmd --list-all  


Creating a initial file basic index.html page

When we install httpd it will create html output directory in /var/www/html , iam creating my index.html file under /var/www/html because when apache trying to open page it look under html directory

Just copy paste below index.html file body  and save it.

·       Create index.html file

Cd /var/www/html

Vi index.html

Add entries

<html>

<head>

<title>Welcome to my test site!</title>

</head>

<body>

This site is for testing purposes only

</body>

</html>


Now check with your URL it should give a index page which we created

Here we completed the installation of HTTPD ( apache) server,

Now, I am starting to enable put method for curl to upload files in my server


Here First iam creating a password file for user apache

·       Create password file

htpasswd -c /home/html/.htpasswd apache

when we run a htpasswd it will ask promt two times for password, please make sure to keep this password save as it require when we upload a file with curl

I am creating my password file I location  /home/html you can create any location but make sure this password file location will b update in httpd configuration file

Which will see in below steps

Here we are  doing changes in httpd configuration file please make according to your environment in below lines

·       Make changes in httpd configuration file –

/etc/httpd/conf

Vi httpd.conf


1)       

#

# Deny access to the entirety of your server's filesystem. You must

# explicitly permit access to web content directories in other

# <Directory> blocks below.

#

<Directory />

    AllowOverride none

    Require all denied

</Directory>


2)


#

# Relax access to content within /var/www.

#

<Directory "/var/www">

    AllowOverride None

    # Allow open access:

    Require all granted

</Directory>


3)

Enable DAV


    #

    # Controls who can get stuff from this server.

    #

   #Require all granted

        Dav On

        AuthType Basic

        AuthUserFile "/home/html /.htpasswd"

        AuthName "Staging Area"

        Require valid-user


</Directory>


4)

# The following lines prevent .htaccess and .htpasswd files from being

# viewed by Web clients.

#

<Files ".ht*">

    Require all denied

</Files>


5)


Add –

    #

    MIMEMagicFile conf/magic

</IfModule>


<IfModule mod_dav_fs.c>

    # Location of the WebDAV lock database.

    DAVLockDB /var/lib/dav/lockdb

</IfModule>


Give apache user permission


·       Give permission :

Apache permission to /var/www/html and /var/lib/dav

Chown apache:apache /var/www/html

Chown apache:apache /var/lib/dav


Here I am setting  SELINUX to permissive after setting this it will required boot server for reflect this is important if not your see a permission error

·       Make  SELINUX = permissive in /etc/selinux config file

SELINUX=permissive


Now restart the httpd and run the curl command

·       Bounce httpd

Systemctl restart httpd

·       Now run curl command

curl --user apache:XXXX  --upload-file filename   http://HOSTIP

note : make sure credential must b correct which create is htpasswd file


Sunday, July 16, 2023

Docker : Install Docker on Oracle Linux 7


Docker : Install Docker on Oracle Linux 7 (OL7)


Install Docker

Enable all the required repositories. To do this you are going to need the yum-utils package.


yum install -y yum-utils zip unzip

yum-config-manager --enable ol7_optional_latest

yum-config-manager --enable ol7_addons


yum install -y oraclelinux-developer-release-el7

yum-config-manager --enable ol7_developer

Install Docker and BTRFS.


yum install -y docker-engine btrfs-progs btrfs-progs-devel

Configure BTRFS

By default the containers are created under the "/var/lib/docker", so you really need to house this on a separate disk or in a separate partition, preferably using BTRFS as the file system.

NOTE : you can keep docker in default location or can create new mount .

I have a second LUN with a device named "/dev/sdb". I could build the file system on this disk directly, but I prefer to partition the disks with a single partition using fdisk. These responses will create a new partition using the whole of the disk ("n", "p", "return", "return", "return", "w").


# fdisk /dev/sdb

Welcome to fdisk (util-linux 2.23.2).


Changes will remain in memory only, until you decide to write them.

Be careful before using the write command.


Device does not contain a recognized partition table

Building a new DOS disklabel with disk identifier 0x2ccc116e.


Command (m for help): n

Partition type:

   p   primary (0 primary, 0 extended, 4 free)

   e   extended

Select (default p): p

Partition number (1-4, default 1): 

First sector (2048-25165823, default 2048): 

Using default value 2048

Last sector, +sectors or +size{K,M,G} (2048-25165823, default 25165823): 

Using default value 25165823

Partition 1 of type Linux and of size 12 GiB is set


Command (m for help): w

The partition table has been altered!


Calling ioctl() to re-read partition table.

Syncing disks.

#

Make the BTRFS file system on the "sdb1" partition. The Oracle Linux 7 Configuring Docker Storage manual describes how to use the docker-storage-config utility to do this with a single command.


# docker-storage-config -s btrfs -d /dev/sdb1

Creating 'btrfs' file system on: /dev/sdb1

#

We can see the file system is added to the "/etc/fstab" file and has been mounted under "/var/lib/docker" by the utility.


# cat /etc/fstab


#

# /etc/fstab

# Created by anaconda on Tue Nov 14 11:49:55 2017

#

# Accessible filesystems, by reference, are maintained under '/dev/disk'

# See man pages fstab(5), findfs(8), mount(8) and/or blkid(8) for more info

#

/dev/mapper/ol-root     /                       xfs     defaults        0 0

UUID=196ae589-c060-46b9-87dc-49d3ed2b01e7 /boot                   xfs     defaults        0 0

/dev/mapper/ol-swap     swap                    swap    defaults        0 0

UUID=10dbd6c1-8ae4-420e-91d8-b021f334e82b /var/lib/docker btrfs defaults 0 0 # added by docker-storage-config

#


# df -h

Filesystem           Size  Used Avail Use% Mounted on

devtmpfs             7.7G     0  7.7G   0% /dev

tmpfs                7.8G     0  7.8G   0% /dev/shm

tmpfs                7.8G   25M  7.7G   1% /run

tmpfs                7.8G     0  7.8G   0% /sys/fs/cgroup

/dev/mapper/ol-root   45G   25G   21G  55% /

/dev/sda1            497M  291M  206M  59% /boot

tmpfs                1.6G   12K  1.6G   1% /run/user/42

tmpfs                1.6G     0  1.6G   0% /run/user/0

/dev/sdb1            100G   17M   98G   1% /var/lib/docker

#

If we didn't have access to the docker-storage-config utility we could have used the following commands.


# mkfs.btrfs -f -L docker1 /dev/sdb1

# systemctl stop docker.service

# rm -Rf /var/lib/docker

# mkdir /var/lib/docker

# echo "LABEL=docker1  /var/lib/docker btrfs defaults 0 0" >> /etc/fstab

# mount /var/lib/docker

Finish Docker Setup

Enable and start the Docker service.


# systemctl enable docker.service

# systemctl start docker.service

You can get information about docker using the following commands.


# systemctl status docker.service

# docker info

# docker version

You are now ready to start using Docker!

Sunday, July 9, 2023

Install oracle apex on Linux

Install oracle apex on Linux:


 Following software are installed in the given order for Apex.


1- openjdk-11.0.2_linux-x64_bin.tar

2- Oracle Database.

3- apex_20.2.zip

4- apache-tomcat-9.0.41.tar.gz

5- ords-20.4.1.013.1644.zip (ords have a .war file which will be deployed on tomacat to access apex).


OS: Linux_x64


1- install database. (I installed 12.1.0.2.0)


2- ------------ Installing Apex ------------------------


a) create dedicated tablespace for apex.


create tablespace apex datafile '/opt/oracle/oradata/orcl/apex01.dbf' SIZE 100M AUTOEXTEND ON NEXT 1M;


b) create directy in which we want to install the apex. unzip the zip file of apex setup (apex_20.2.zip).


mkdir /opt/apex

unzip apex_20.2.zip


c) Connect to SQL*Plus as the SYS user and run the "apexins.sql" script, specifying the relevant tablespace names and image URL.

cd /opt/apex

sqlplus / as sysdba

@apexins.sql APEX APEX TEMP /i/


d) change the admin password:

cd /opt/apex

sqlplus /as sysdba

@apxchpwd.sql

-----------------------------

e) Create the APEX_LISTENER and APEX_REST_PUBLIC_USER users by running the "apex_rest_config.sql" script.

sqlplus / as sysdba

@apex_rest_config.sql (i set the password apex)


3- --------------Installing Tomcat -------------------


a) create a directory for java and unzip it.


mkdir /opt/java

tar -xzvf openjdk-11.0.2_linux-x64_bin.tar.gz


b) create soft link to set java as latest java.


ln -s jdk-11.0.1 latest


c) make a directory for tomcat and unzip it.


mkdir /opt/tomcat

tar -xzvf apache-tomcat-9.0.41.tar.gz


 ln -s apache-tomcat-9.0.14 latest

d) create .env file for java.

vi /home/oracle/java.env

export JAVA_HOME=/opt/java/jdk-11.0.2

export PATH=$JAVA_HOME/bin:$PATH

e) start the tomcat services.

. /home/oracle/java.env

/opt/tomcat/apache-tomcat-9.0.41/bin

./startup.sh

f) check the status of the tomcat:

ps -ef|grep tomcat

http://192.168.0.100:8080/


4- --------------Installing ORDS ------------------


a) Unlock the following users and change their passwords:


ALTER USER SYS IDENTIFIED BY nosys ACCOUNT UNLOCK;

ALTER USER APEX_LISTENER IDENTIFIED BY apex ACCOUNT UNLOCK;

ALTER USER APEX_PUBLIC_USER IDENTIFIED BY apex ACCOUNT UNLOCK;

ALTER USER APEX_REST_PUBLIC_USER IDENTIFIED BY apex ACCOUNT UNLOCK;


-- The next one will fail if you've never installed ORDS before. Ignore errors.

ALTER USER ORDS_PUBLIC_USER IDENTIFIED BY apex ACCOUNT UNLOCK;


b) Unzip the ORDS.

mkdir /opt/ords

unzip ords-20.4.1.013.1644.zip


c) Make a directory to hold the configuration.


mkdir -p /opt/ords/conf


edit the following file and input only given entries.


vi /opt/ords/params/ords_params.properties


db.hostname=localhost

db.port=1521

db.servicename=orcl

db.sid=orcl


d) Set the configuration directory:

cd /opt/ords

. /home/oracle/java.env


$JAVA_HOME/bin/java -jar ords.war configdir /opt/ords/conf


e) Start the configuration:


$JAVA_HOME/bin/java -jar ords.war


--------

[oracle@apex1 ords]$ $JAVA_HOME/bin/java -jar ords.war

Requires to login with administrator privileges to verify Oracle REST Data Services schema.


Enter the administrator username:sys

Enter the database password for SYS AS SYSDBA:

Confirm password:

Connecting to database user: SYS AS SYSDBA url: jdbc:oracle:thin:@//localhost:1521/orcl


Retrieving information.

Enter 1 if you want to use PL/SQL Gateway or 2 to skip this step.

If using Oracle Application Express or migrating from mod_plsql then you must enter 1 [1]:

Enter a number to select a feature to enable:

   [1] SQL Developer Web  (Enables all features)

   [2] REST Enabled SQL

   [3] Database API

   [4] REST Enabled SQL and Database API

   [5] None

Choose [1]:

2021-02-01T19:51:51.705Z INFO        reloaded pools: []

Installing Oracle REST Data Services version 20.4.1.r0131644

... Log file written to /home/oracle/ords_install_core_2021-02-01_145151_00860.log

... Verified database prerequisites

... Created Oracle REST Data Services proxy user

Warning: Nashorn engine is planned to be removed from a future JDK release

... Created Oracle REST Data Services schema

... Granted privileges to Oracle REST Data Services

... Created Oracle REST Data Services database objects

... Log file written to /home/oracle/ords_install_datamodel_2021-02-01_145218_00571.log

... Log file written to /home/oracle/ords_install_apex_2021-02-01_145222_00690.log

Completed installation for Oracle REST Data Services version 20.4.1.r0131644. Elapsed time: 00:00:34.176 


Enter 1 if you wish to start in standalone mode or 2 to exit [1]:2

--------

f)

mkdir -p /opt/tomcat/apache-tomcat-9.0.41/webapps/i

cp -R /opt/apex/images/* /opt/tomcat/apache-tomcat-9.0.41/webapps/i


cp /opt/ords/ords.war /opt/tomcat/apache-tomcat-9.0.41/webapps


g) Change the Tomcat default listen port from 8080 to 8085:


vi /opt/tomcat/apache-tomcat-9.0.41/conf/server.xml


<Connector port="8085" protocol="HTTP/1.1"

               connectionTimeout="20000"

               redirectPort="8443" />
-----------------------------------------------------------------------------

In-Case of error (WARNING: The pool named: |apex|| is invalid and will be ignored), update the password from following user and 

edit the following files and input new password.


alter user ORDS_PUBLIC_USER identified by  381;

alter user APEX_PUBLIC_USER identified by 381;

alter user APEX_LISTENER identified by 381;

alter user APEX_REST_PUBLIC_USER identfied by 381;


cd /opt/ords/conf/ords/conf/

vi apex_rt.xml

vi apex.xml 

vi apex_al.xml

vi apex_pu.xml

Wednesday, July 5, 2023

EBS WITH DBCS

 Boosting Business Agility Oracle E-Business Suite (EBS) with Oracle Database Cloud Service (DBCS)


Note:
The minimum database version required for Oracle Database Cloud Service (DBCS) integration with Oracle E-Business Suite (EBS) R12.2.x is Oracle Database 19c Only.


Oracle DBCS is a fully managed, scalable, and secure database service provided by Oracle its cloud-based service that makes it easy to deploy and manage Oracle databases in the cloud. With DBCS, you can provision new databases in minutes and scale up or down as needed without having to worry about capacity planning or managing complex infrastructure. In today's data-driven world, businesses are constantly striving for agility and scalability to meet evolving demands.

DBCS Will Auto Manage :

*Automated Backup and Recovery
*Automated Patching and Upgrades (for Database Only )
*Automatic Storage Management
*Automated Performance Tuning
*Automatic SQL Plan Management
*Automatic Indexing
*Query Optimization
*In-Memory Caching

DBCS accelerates data processing and improves response times. This translates into faster application performance, increased productivity, and improved customer experiences.


If you're ready to take your data management to the next level, it's time to explore the benefits of Oracle DBCS. Embrace the power of the cloud and propel your organization towards a more agile and efficient future. Experience the transformative potential of DBCS and unlock the true value of your data.

Monday, June 5, 2023

DATABASE UPGRADE USING AUTOUPGRADE TOOL FROM 12c to 19c.

Oracle 19c Database was introduced in EBS R 12.2 in September 2019 and updated several additional certifications with a lot of new features and enhanced services in September 2020. Customers who are using 11g or 12c databases are already upgrading the database to 19c as it provides new features such as


Automatic Indexing

Automated Testing of Query Plans

Active Data Guard DML Redirection

Easy Connect Enhancements

Previously chargeable features now offered free of charge


 It is a feature that is enhanced in oracle 19c and it is mainly used to automate the upgrade process.it not only automates the database upgrade but also performs the pre-upgrade steps and the post upgrade steps automatically.it just simplifies the upgrade activity, previously we have to use dbua/manual method/datapump methods to upgrade the database now we can upgrade the number of databases using AutoUpgrade utility within the short span of time.

Note :   If you are doing AutoUpgrade on same server it is not necessary to run the upgrade mode you can stop with the deploy mode, our database will be upgraded.

On the other hand if you are performing AutoUpgrade on different servers it is necessary to run all the mode till upgrade mode.(i.e. analyze, fixups, deploy, upgrade)

AutoUpgrade is available for Oracle Database Enterprise Edition, and Oracle Database Standard Edition. It is not available for Oracle Database Express Edition.

AutoUpgrade Support is available for Oracle Database 12c Release 2 (12.2) and Oracle Database 18c (18.5) target homes. For both Oracle Database 12c Release 2 (12.2) and Oracle Database 18c (18.5) target homes.

Advantages of AutoUpgrade Utility:

  • Time saving method (completes the upgrade in a short time)
  • can upgrade multiple Oracle Database deployments at the same time, using a single configuration file, customized as needed for each database deployment.
  • preventing the issues before upgrade.
  • It automatically performs the preupgrade and post upgrade steps/checks.

AUTOUPGRADE PROCESSING MODES:

Generally AutoUpgrade processes in four modes, they are ,

  • Analyze

It performs a read only pre-upgrade analysis of databases before upgrade and detects any issues which may prevent the successful completion of upgradation.it should be run in the source database like normal operations.

  • Fixups

In Fixups mode it checks the same as it have done in the analyze mode, so that it can identify issues that require fixing. In Fixup Mode, the AutoUpgrade utility detects and identifies both fixes that require manual intervention and AutoUpgrade utility can clear the fixduring upgrade.

  • Deploy

In deploy mode it confirms that our database has been successfully upgraded and it copies the sqlnet.ora, listener.ora, tnsnames.ora from source to target home.

  • Upgrade

An upgrade completes with either deploy or upgrade, after this we can run our post upgrade checks.in this we can run our custom scripts on the upgraded databases in accordance with the configuration file that we have created. After this the upgraded oracle database starts with a new oracle home.

AutoUpgrade utility jobs pass through a series of phases, called stages, during which specific actions are performed.

AutoUpgrade has the following stages,

SETUP
PREUPGRADE
PRECHECKS
GRP
PREFIXUPS
DRAIN
DBUPGRADE
POSTCHECKS
POSTFIXUPS
POSTUPGRADE

Overview steps:

Step:1 Check for the autoupgrade.jar file version which is already present in the database.($ORACLE_HOME/rdbms/admin/preupgrade.jar)

Step:2 Then we have to download the latest autoupgrade.jar version and then we have to share the file in /home/oracle location and check the version of the file.

Step:3 Our database which we are going to upgrade must be in archivelog mode and flashback should be enabled.

Step:4 Create a configuration file which consists of source Sid, log directory, start time of the upgrade, target home, source db version.

Step:5 Once we run the analyze mode it checks for any issues and also it analyses the source database, it will estimate the time when the upgrade will get completed, jobs that are running, status of the jobs ,once it is completed without any error we can run the fixups mode here also the same it detects and fixes the bugs that is either by manual or bugs that is fixed automatically during upgrade.

Step:6 After this the next stage is deploy and upgrade both are same which upgrades our database, it confirms that our database is upgraded successfully. here it transfers the listener.ora, tnsnames.ora files from source home to target’s home. Then we can start our upgraded database in the new oracle home.

Step:7 Then check time zone version of upgraded database.


Step:1 Check for the autoupgrade.jar version which is already present. The autoupgrade.jar file is available in the Oracle 19c database software in the $ORACLE_HOME/rdbms/admin directory.

Step:2 Then download the latest version of autoupgrade.jar from the oracle support.

Step:3 Create the configuration files containing the parameters where the logs should be stored, dbid, database name to be upgraded, source and target version home.

Contents present in the configuration file:

#
# Global logging directory pertains to all jobs
#
global.autoupg_log_dir=/u01/app/oracle/autoupgrade        # Top level logging directory (Required)
#
# Database 1
#
upg1.dbname=chennai
upg1.source_home=/u01/app/oracle/product/12.2.0.1/dbhome_1
upg1.target_home=/u01/app/oracle/product/19.0.0/dbhome_1
upg1.sid=chennai
upg1.start_time=now
upg1.log_dir=/u01/app/oracle/autoupgrade/chennai
upg1.upgrade_node=primary.localdomain
upg1.run_utlrp=yes
upg1.timezone_upg=yes
upg1.target_version=12.2

Step:4 Enable the archive log mode in the database which is to be upgraded.

Step:5 Analyze the database to be upgraded using the analyze mode and fixups the issues by running fixups mode.

There are three main commands in this upgrade to check the status of the upgrade.

lsj       –   list the jobs which are running.

tasks  –  to see the tasks of the jobs and their status.

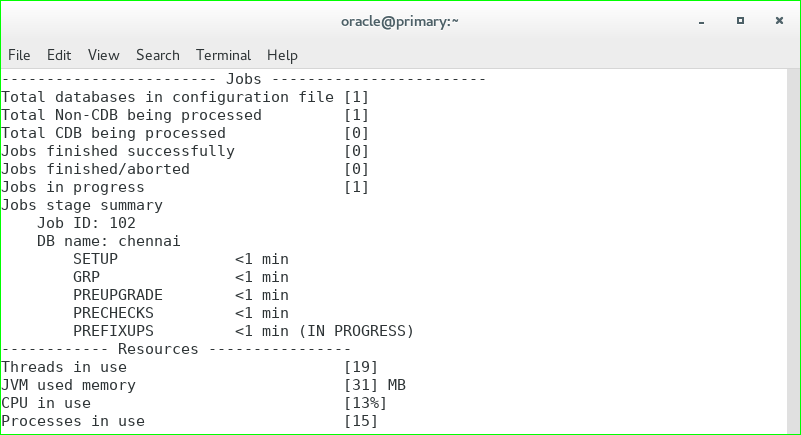
status – it gives an overall summary of the upgrade, here we can see the no of container and non-container databases, job finished successfully, job aborted and jobs which are in progress state.

Other than these there are some commands which helps you to perform the AutoUpgrade in a better way.

Running  Analyze mode:

$ORACLE_HOME/jdk/bin/java -jar /home/oracle/autoupgrade.jar -config /tmp/config.txt -mode analyze

Running fixups mode:

$ORACLE_HOME/jdk/bin/java -jar /home/oracle/autoupgrade.jar -config /tmp/config.txt -mode fixups

Step:6 After these above steps are completed successfully we can proceed the upgrade process using deploy and upgrade modes.

Running deploy mode:

$ORACLE_HOME/jdk/bin/java -jar /home/oracle/autoupgrade.jar -config /tmp/config.txt -mode deploy

Our database is upgraded successfully from 12c to 19c using AutoUpgrade tool.

Here I am checking whether database is upgraded or not by running the 19c environment file and logging in to the database and also verify the name, open mode and timezone version.